How to Make 4 Stunning Korean Kimbap Recipes.
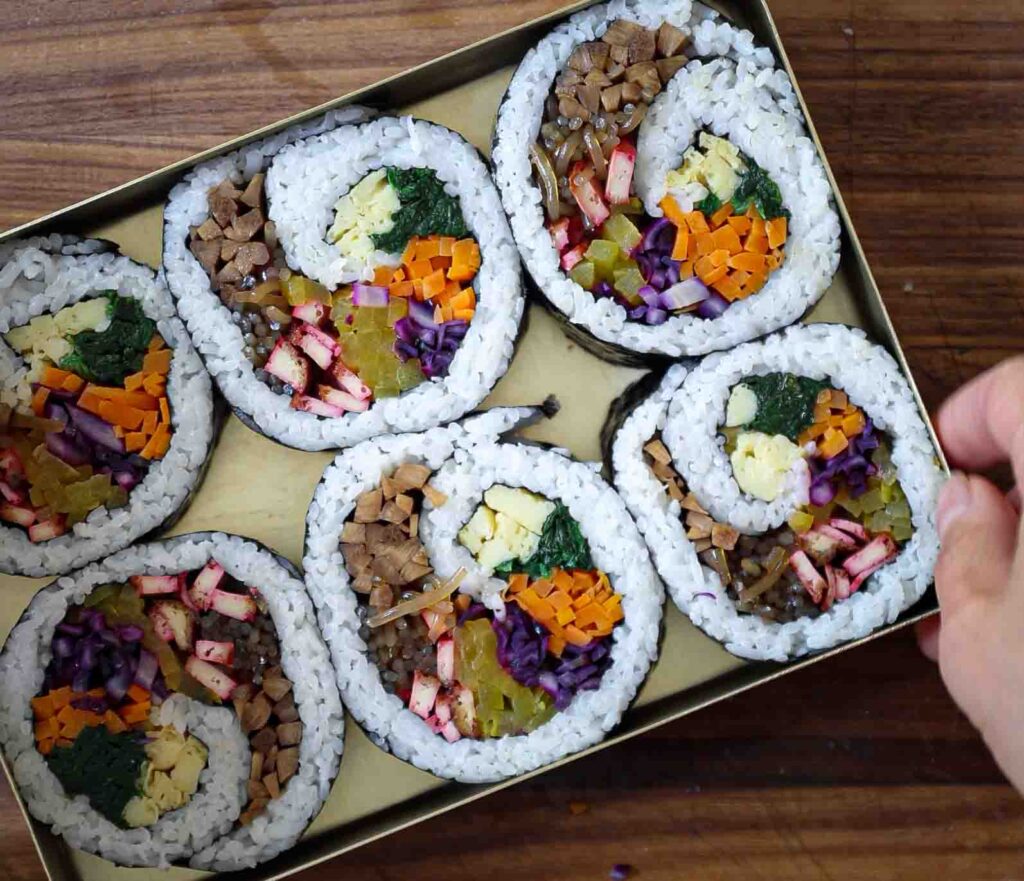
Nutritious. Delicious. Fun. And even Fancy.
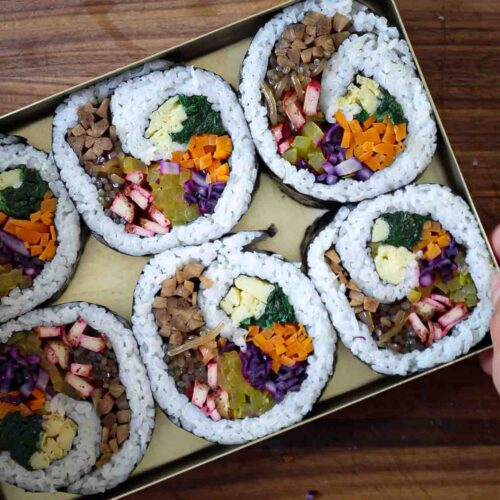
Walk through any Korean grocery store, and you will always see kimbap or “Korean rice rolls” (sometimes, mistakenly referred to as “Korean sushi”) sitting in the “fresh foods” section. In this week’s blog post, I’ll show you how to make four different kinds of vegan kimbap recipes, including the classic kimbap (the kind my grandmother used to pack for us on all our road trips to Wisconsin Dells), as well as what I call “Fancy Kimbap”–the kind you make for holidays and dinner parties or, you know, for that special someone you want to impress with all your skill and love!
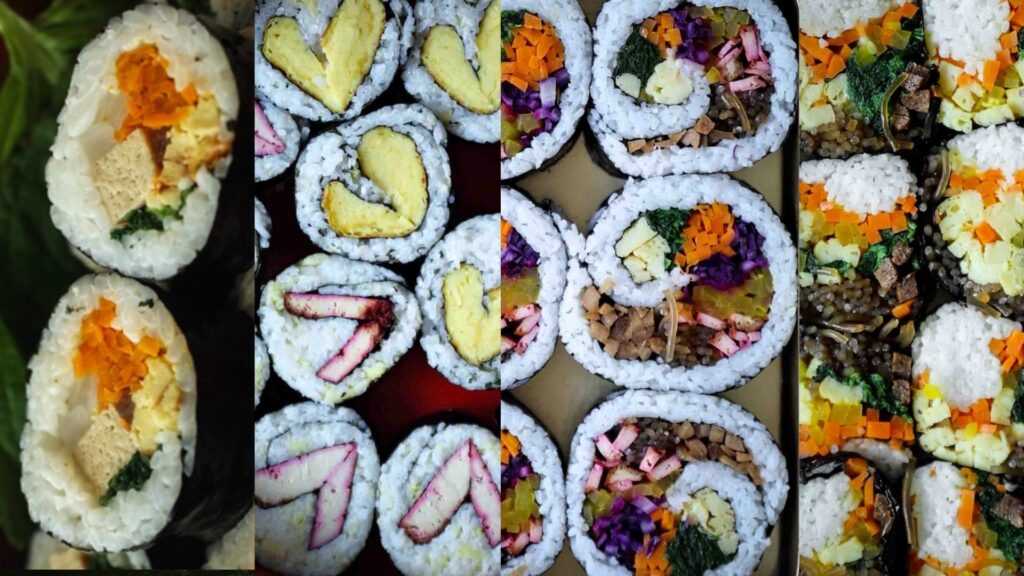
I made these for my husband on Valentine’s Day and they were a BIG HIT. In this article, we will be making four different kinds of kimbap:
- Traditional Kimbap
- Chunky Kimbap
- Spiral Kimbap
- Heart Kimbap
So, without further ado, let’s dig into this iconic Korean classic!
- What Even Is Kimbap?
- What Are the Main Components of Kimbap?
- Key Ingredients and Notes on Substitutions for these Four Kimbap Recipes.
- Equipment You'll Need for Making Kimbap.
- How to Make the Fillings for Kimbap.
- How to Assemble Your Kimbap.
- Video: Watch Me Make Fancy Kimbap
- Storing and Reheating Your Kimbap.
- Video: Watch Me Make Traditional Kimbap!
- Frequently Asked Questions.
- Recipe Card
- Questions & Comments
Disclaimer: Some of the links in this post may be affiliate links for products I use and love. If you make a purchase after clicking one of those links, I may earn a small affiliate commission, perhaps enough to buy some extra gochujang or gochugaru 🙂
What Even Is Kimbap?
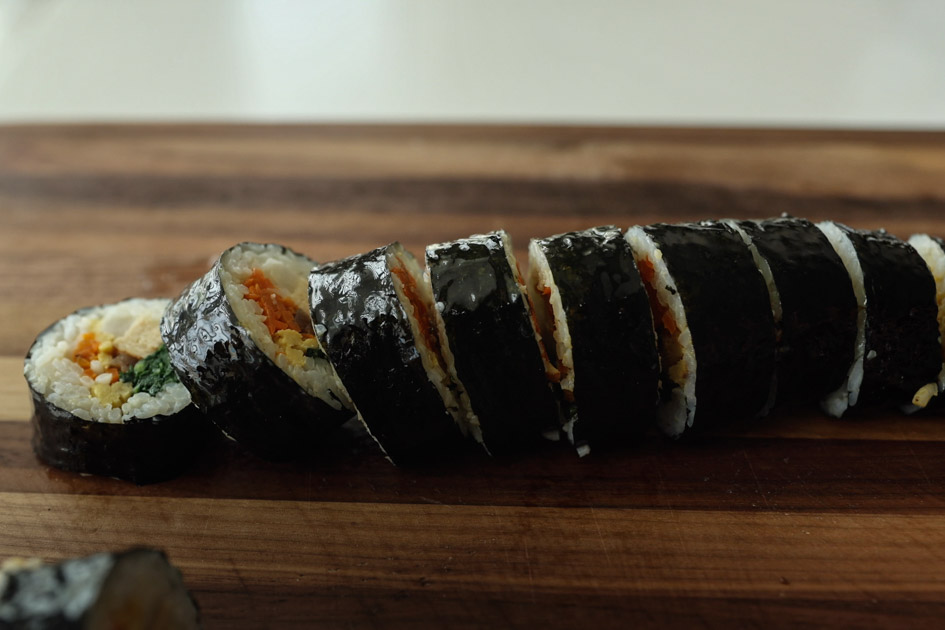
Though it wasn’t always so, kimbap is now a very popular Korean dish. The word “kimbap” or 김밥 in Korean literally translates into “seaweed rice.” In some ways, the first or perhaps most simple Korean kimbap is just a little roasted seaweed (you know, the kind you can buy at virtually any grocery store in small containers about the size of a deck of cards) wrapped around a spoonful of white rice.
There isn’t a Korean American kid in the United States who hasn’t had an entire meal composed exclusively of this very humble but addictively tasty morsel of Korean food. Unlike its more well-known varieties, this 2-ingredient kimbap is easy to prepare and doesn’t take lots of work. Hence, it quickly becomes a reliable part of a Korean mom’s culinary arsenal, particularly if she’s dealing with fussy eaters (I wasn’t one of them, I swear!). In fact, when my brother and his 6-year old son were visiting me for the holidays, Liam ate this kind of kimbap at almost every meal!
What is the origin of kimbap? Well, as is often the case, there are multiple theories on how kimbap sprang into existence. Some believe that kimbap is a natural extrapolation of the above–a little seaweed wrapped around a little rice. This staple of the Korean diet has been around since the Joseon era (i.e., for 1,000 years!).
Others believe that kimbap came about during the Japanese occupation of Korea and that kimbap is a Korean iteration of maki or Japanese sushi. There are some major differences between kimbap and maki (which we’ll discuss), but honestly, I’m not sure it really matters (or that you really care) where kimbap definitively comes from. All that matters is that it tastes AMAZING!
What Are the Main Components of Kimbap?
Given the name of this dish, it should come as no surprise that kimbap starts with two universal ingredients: rice and seaweed.
Of course, the 2-ingredient kimbap is not the kind of kimbap that people think of when it comes to Korean cuisine. When people hear the word kimbap, they think of all the various fillings sandwiched inside the sheet of seaweed and cooked rice, usually falling into the following categories:
- Protein
- Cooked vegetables
- Pickled vegetables
- Egg omelet
In other words, there are as many different kinds of kimbap as there are kimbap fillings! The basic rule of thumb, however, is to try and provide a balanced “bite” with each piece of kimbap. This “balance” refers to texture, flavor, and nutrition. Hence, most kimbap will have savory and tart vegetables, cooked and uncooked vegetables, as well as some kind of protein (e.g., bulgogi kimbap or tuna kimbap). Although there are endless variations of kimbap, this blog post will cover four different vegan or vegetarian kimbap recipes that are fit for a school picnic table or a royal palace!
Key Ingredients and Notes on Substitutions for these Four Kimbap Recipes.
The following are the key ingredients for the four different kimbap recipes covered in this post, including notes on potential substitutions:
- Seaweed Sheet or Nori Sheet. Whether you call it nori or seaweed usually makes no difference (it only makes a difference if you’re speaking to a Korean person)–for shopping purposes, it’s the same. Luckily, you don’t need to resort to an Asian grocery store to find good quality seaweed sheets. You can find them at most local non-Asian grocery stores in the International aisle. Someone asked me today what a good substitution for seaweed sheets might be and the truth is, if you sub in something else for the “kim” (seaweed) in “kim-bap”…. Well, it isn’t really kimbap anymore. That said, if you want to have all the fun and deliciousness of making kimbap without the seaweed, you can substitute in soy wrap, a common non-seaweed ingredient used in making sushi.
- Short Grain White Rice. Kimbap is typically made using short-grain white rice. Part of it is for appearance–the white rice really helps to make the colorful filling stand out. But appearances aren’t the only reason kimbap uses short grain rice. Brown rice or long-grain rice is not as starchy as short white rice and, as a result, the roll is more challenging to make. Rice grains tend to fall out or the roll falls apart altogether, as rice grains are often used as a “glue” to keep kimbap rolls in one piece. Can you use brown rice or medium grain rice? Sure! It’ll just be a little trickier to keep everything looking nice and tidy. But it’ll still be very delicious!
Tip: Do you need to get “sushi rice” to make kimbap? Technically speaking, sushi rice refers to the treatment of short-grain white rice to make sushi. For sushi, the rice is seasoned with rice vinegar, mirin, or sweeteners to achieve a sweet and sour flavor profile. Does that mean those bags of uncooked rice labeled “sushi rice” have been treated with rice vinegar? No! LOL. It just means that clever marketers capitalized on the popularity of sushi to call plain old short-grain white rice “sushi rice.” It isn’t any different, though! Bottom line: you don’t have to pick up a bag of “sushi rice” to make kimbap. Any short-grain white rice will do and, as we discussed above, you can substitute with whatever kind of rice you want, if you’re willing to deal with a little mess!
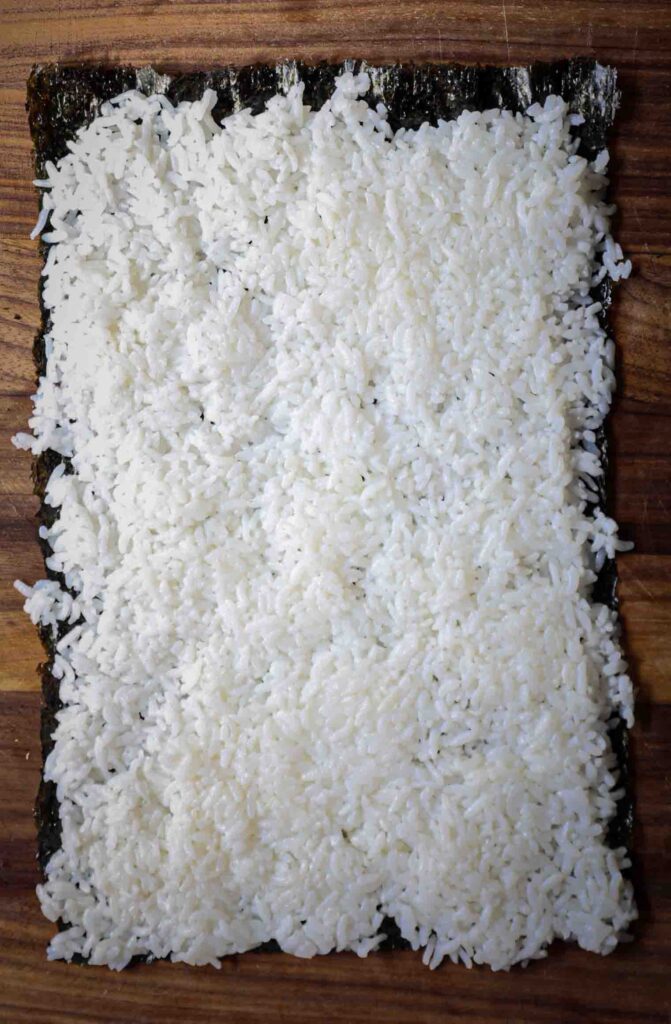
- Proteins. For the kimbap recipes in this blog post, we’ll be utilizing a variety of proteins, including
- baked tofu, for which you can substitute sautéed super firm or extra firm tofu;
- Plantspired Korean BBQ, for which you can substitute shiitake mushrooms or baked tofu; and
- super firm tofu, for which you can substitute extra firm tofu.
- Cooked Vegetables. These four kimbap recipes will be using a ton of different kinds of vegetables, including,
- boiled spinach, for which you can substitute any sturdy, leafy green (like kale, chard, collard greens, etc.);
- sautéed carrots, for which you can substitute any carrot-y orange vegetable (like garnet yams); and
- sautéed purple cabbage, for which you can substitute regular green cabbage, though you’ll miss out on the antioxidants and the purple part of the rainbow.
- Pickled Vegetables. These kimbap will also incorporate pickled (uncooked) vegetables, including,
- yellow pickled daikon radish or danmuji (단무지), for which you can substitute white pickled daikon radish (though you’ll miss out on the yellow part of the rainbow) or bread pickles (which has a similar flavor and texture profile); and
- pickled burdock root, for which you can substitute more danmuji (pickled daikon) or pickled carrots.
Tip: If you want to keep your spicy vegan tteokbokki gluten-free, make sure to pick up gluten-free gochujang!
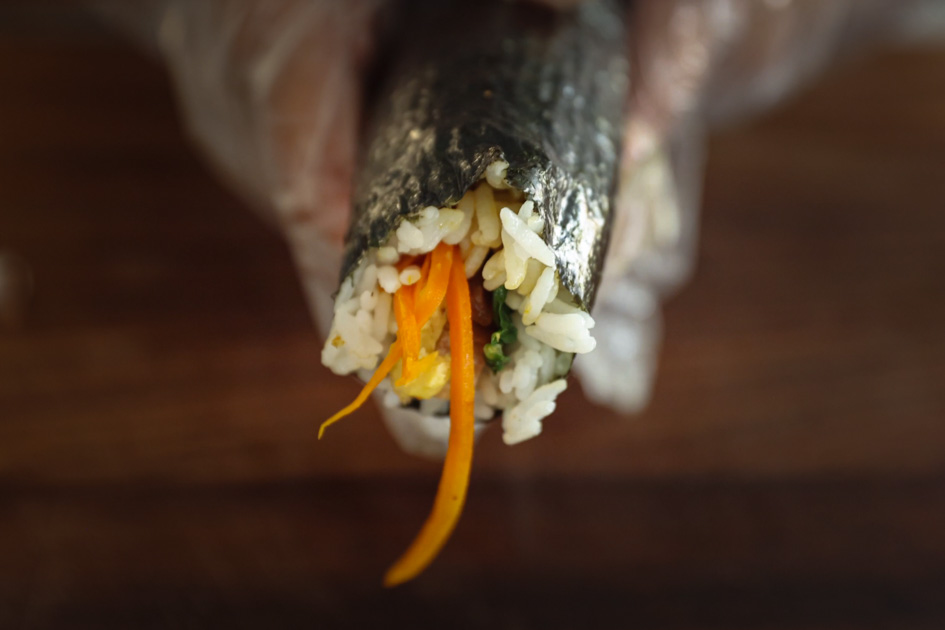
- Korean Style Omelet or Gyerranmari (계란마리). These kimbap will include vegan egg omelets, cut into strips or julienned (either is fine). My preferred products for these are either the liquid JUST Egg (which you will need for the Heart Kimbap) or JUST Egg Folded (which you can use for all the other recipes). If you don’t have access to a good vegan omelet, you can always omit the egg parts altogether.
- Sautéed Korean Glass Noodles or Dangmyeon (당면). One somewhat unusual ingredient we’ll be including in these recipes is sautéed glass noodles or sweet potato vermicelli. You don’t typically see these in the classic kimbap recipe, but these chewy, gluten-free noodles offer a unique and fun texture to some of the “fancier” kimbap. You can substitute the skinnier rice noodles you often see in spring rolls. I would not try and substitute wide rice noodles, as those will likely flop around and make rolling a pain in the you-know-what!
Equipment You’ll Need for Making Kimbap.
The following is equipment that will ensure a pleasant experience in your kitchen as you make your Kimbap.
- Bamboo Mat. My mother always uses a bamboo mat to make her kimbap; therefore, naturally, I like to use a bamboo mat as well. But if you don’t have one, you can use aluminum foil (my mom has used that too!). The purpose of the mat is to make sure your roll is nice and tight, so that when you cut it into pieces, the fillings don’t fall out.
- Large Bowls and Plates or Baking Sheets. You will need at least one large bowl to keep your base rice (more on that later). I then like to arrange all my ingredients on large plates or even a baking tray, for ease of access.
- Non-stick Pan (a Real One). The biggest question I get asked is “how do you get your JUST Egg to not stick?” It all starts with a proper non-stick pan–not one of those pretend non-stick pans. If you are uncomfortable with using Teflon (I don’t blame you), I love using these hybrid steel/non-stick pans. You’ll be making at least one Gyerranmari (for the Heart Kimbap), so make sure you get your hands on a good non-stick pan that works!
- Disposable Gloves. The rice can get sticky–that’s sort of the point. While this ensures your rolls will stay together, it can also make the process a little challenging. People often use disposable gloves while making kimbap, not just to guard against stickiness but also because your hands will get into all the ingredients. If you don’t want to use disposable gloves, make sure to keep a small bowl of water nearby to help with the stickiness.
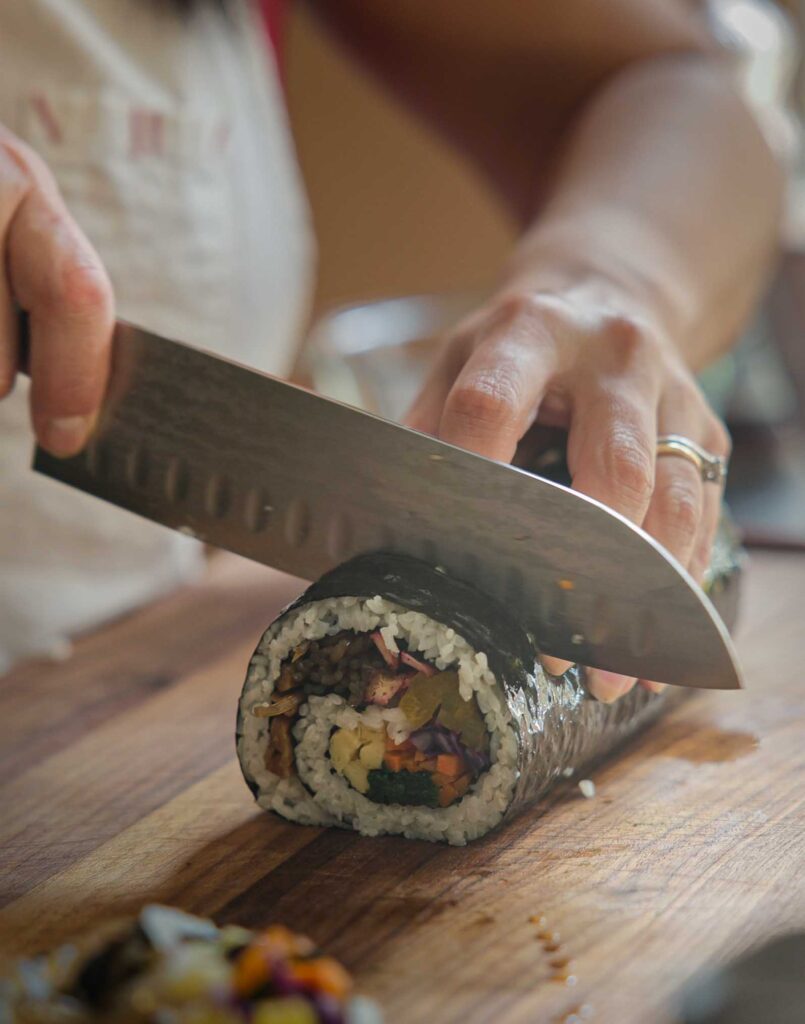
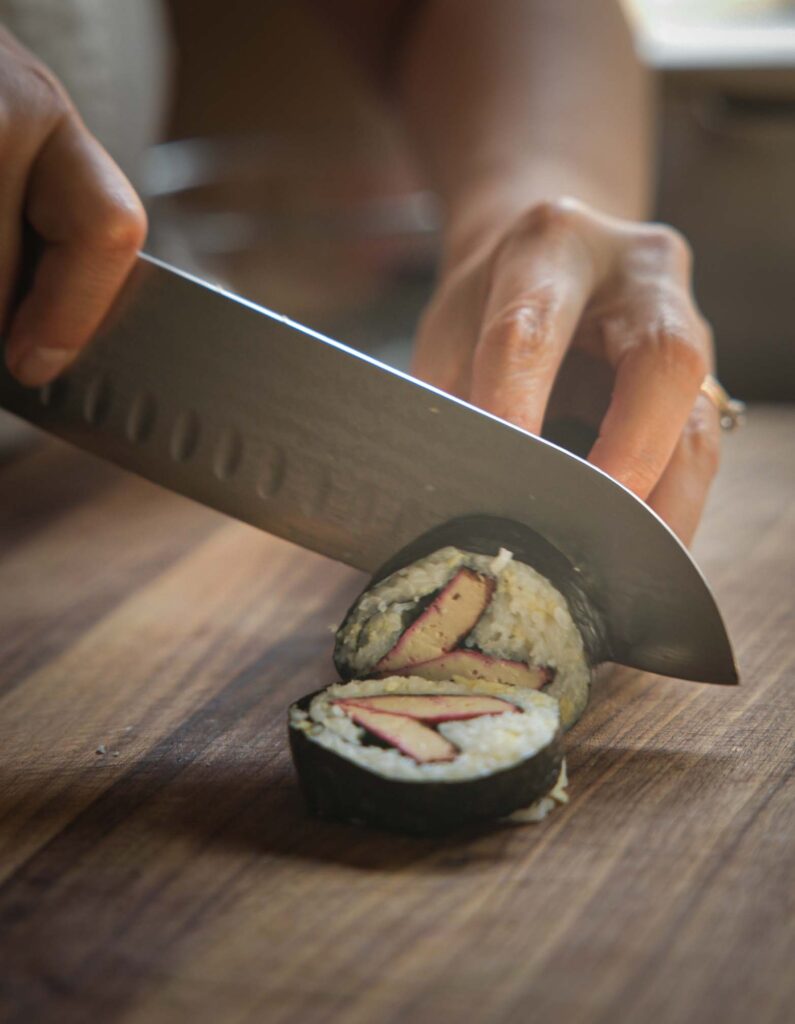
- Sharp Knife. The last thing you want is to ruin all your hard work with a dull knife, which will tear–not slice–the seaweed and create messy, unbeautiful pieces of kimbap. Make sure you have access to a very sharp knife when it’s time to cut your rolls!
How to Make the Fillings for Kimbap.
The best way to approach kimbap is to make all the fillings first, arrange them so they are easily accessible, and then begin assembly. Below, we’ll tackle all the fillings, from the rice to protein to cooked vegetables and the Korean omelet.
How to make the “base rice.”
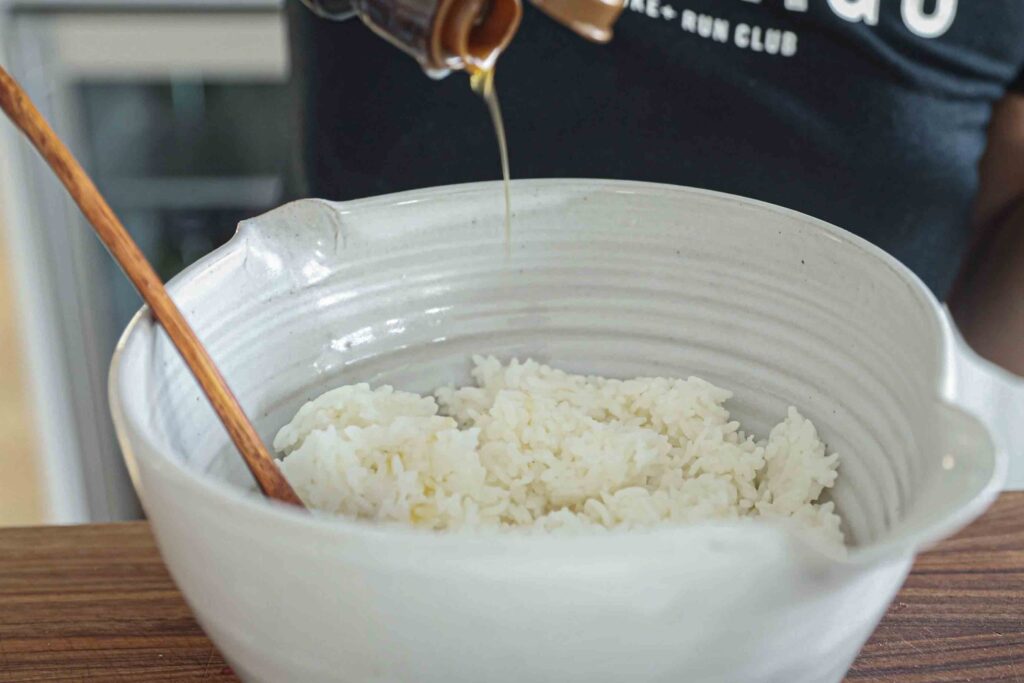
The first thing you’ll want to make is your “base rice.” This isn’t a term of art–it’s a totally “Joanne” phrase. It refers to the rice that will go into all of your kimbap, whether you make one of these four recipes or any other kind of kimbap. As I mentioned before, “sushi rice” refers to the rice typically used in making sushi or maki–short grain white rice treated with rice vinegar or mirin or some other blend of sweet and sour. The main difference between sushi and kimbap is that kimbap utilizes savory flavors for its rice.
So, the next time someone asks you “what’s the difference between sushi and kimbap?” you can answer, “Mainly, it’s the rice. Kimbap rice is seasoned with savory flavors while sushi rice is seasoned with sweet and sour flavors.”
To make your kimbap “base rice,” simply add and incorporate 1 teaspoon of sea salt, 1/2 teaspoon cracked black pepper, and 1 teaspoon of toasted sesame oil to every 2 cups of cooked rice. Done!
This base rice will remain unmodified for 3 out of the 4 kimbap recipes in this article. For the last recipe (Heart Kimbap), we will add a little color and texture with cooked egg (vegan) and perilla leaves.
How to make the protein fillings.
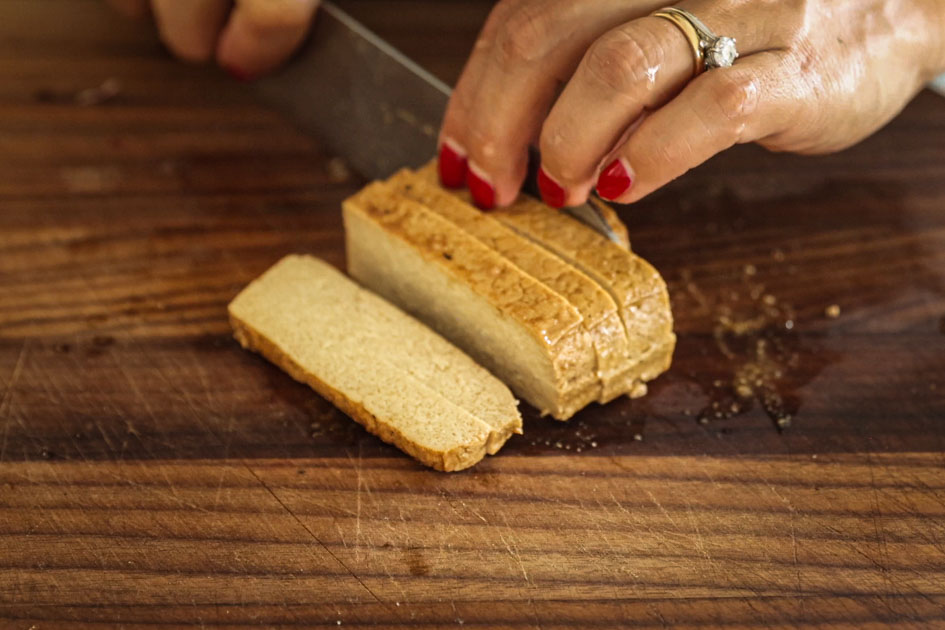
All four of the kimbap recipes in this article will include a protein–either tofu or Plantspired Korean BBQ (a soy-based meat alternative that is so convincing, many of my non-vegan friends and family members think it’s steak).
- Protein for Traditional Kimbap: The protein for Traditional Kimbap will be baked tofu cut into batons. These days, you can find baked tofu cutlets in a variety of flavors at non-Asian and Asian grocery stores alike. My absolute favorite kind of baked tofu is Nasoya’s Teriyaki Baked Tofu. If you do not have access to baked tofu, simply slice up your tofu into batons (i.e., pieces that are about the width of your pinky finger) and sauté them in a little extra virgin olive oil (so they aren’t too soft).
- Protein for Chunky Kimbap: For the Chunky Kimbap, simply cook the Plantspired Korean BBQ according to package instructions (I usually just sauté the pieces in a tiny bit of oil for about 5 to 7 minutes, until they get a little color). Set them aside to cool. When they are safe to handle, run your knife through them so they are sliced into thin pieces (this will make it easier to use when assembling your rolls).
- Protein for Spiral Kimbap: For both the Spiral and Heart Kimbap, you will be using super firm tofu (or extra firm tofu), sliced into 3/4-inch thick pieces that then marinate in a little bit of beet juice (for the lovely pink color!). After allowing the pieces to marinate in beet juice for about 30 minutes, give the cutlets a quick sear on the stovetop. Then, run your knife through the beet marinated tofu cutlets to create small, thin pieces.
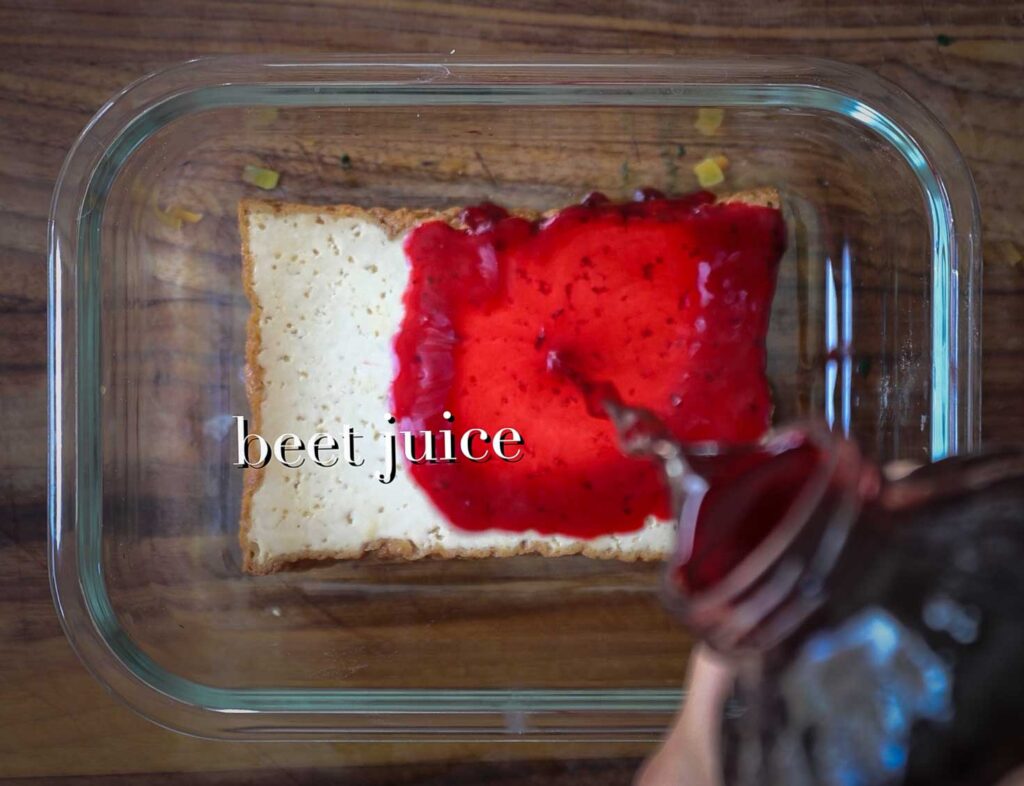
- Protein for Heart Kimbap. For the Heart Kimbap, slice the beet marinated cutlets in half, lengthwise, to create two pieces:

Next, for each half, you’re going to slice the cutlet, lengthwise, but at a bias, as well as along the top and bottom corners:

How to make cooked vegetables.
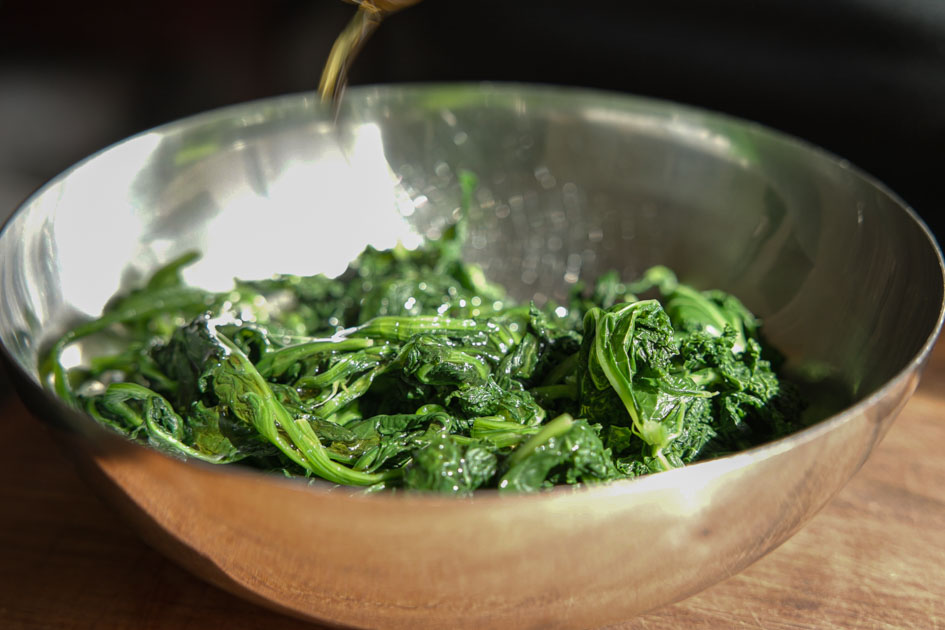
- Cooked Vegetables for Traditional Kimbap. There are two cooked vegetable components for the Traditional Kimbap: (a) boiled and seasoned spinach, and (b) sautéed carrots.
- For the boiled spinach, simply boil the spinach for about 1 minute (until the spinach turns bright green). Then rinse them in cold water to stop the cooking process. Squeeze out as much excess water as you can before placing the cooked spinach in a bowl. Add and incorporate 1 teaspoon of sesame oil, 1/2 teaspoon sea salt, and 1/4 teaspoon black pepper.
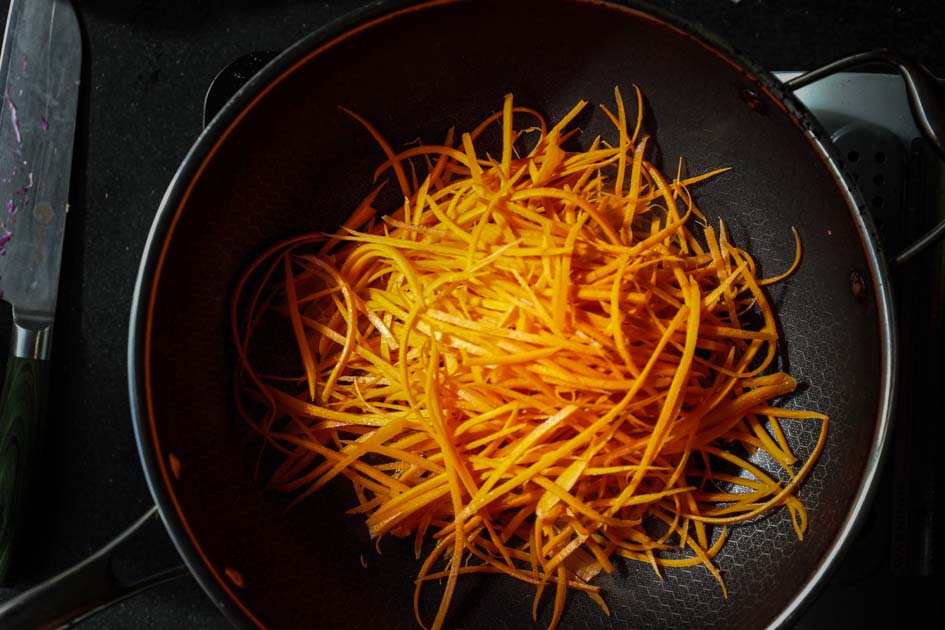
- For the carrots, add 1/2 tablespoon of extra virgin olive oil to a large sauté pan. When the oil gets nice and shimmery, throw in your julienned carrots and cook them until they start to get soft, about 2 minutes. Season with salt and pepper and finish them with 1/2 teaspoon sesame oil.
- Cooked Vegetables for Chunky Kimbap: I’ve got good news! The cooked vegetables for Chunky Kimbap are the same as for Traditional Kimbap! If you intend to make both in one go, just double your quantities of boiled spinach and sautéed carrots!
- Cooked Vegetables for Spiral Kimbap: For Spiral Kimbap, in addition to the boiled seasoned spinach and sautéed carrots from the Traditional Kimbap, you’ll also sauté some purple cabbage, the same way you sautéed the carrots: a little extra virgin olive oil, salt, pepper, and sesame oil for finish.
How to make Gyerranmari (Korean omelet).
There are a lot of different ways to prepare the Gyerranmari, but the easiest way is to microwave some JUST Egg Folded! ? I am NOT above taking shortcuts, especially when I’m making a lot of kimbap (which is truly a labor of love).
But if you don’t have access to JUST Egg Folded, simply pour the JUST Egg liquid into a medium-sized (~10 inch diameter) non-stick pan over medium heat. Allow the JUST Egg to cook for about 3 minutes over medium heat (do not increase the heat!), until the bottom loosens easily from the pan when you wedge a spatula beneath it. Flip the entire omelet like a crepe. Cook for another 2 minutes, until both sides are fully cooked.
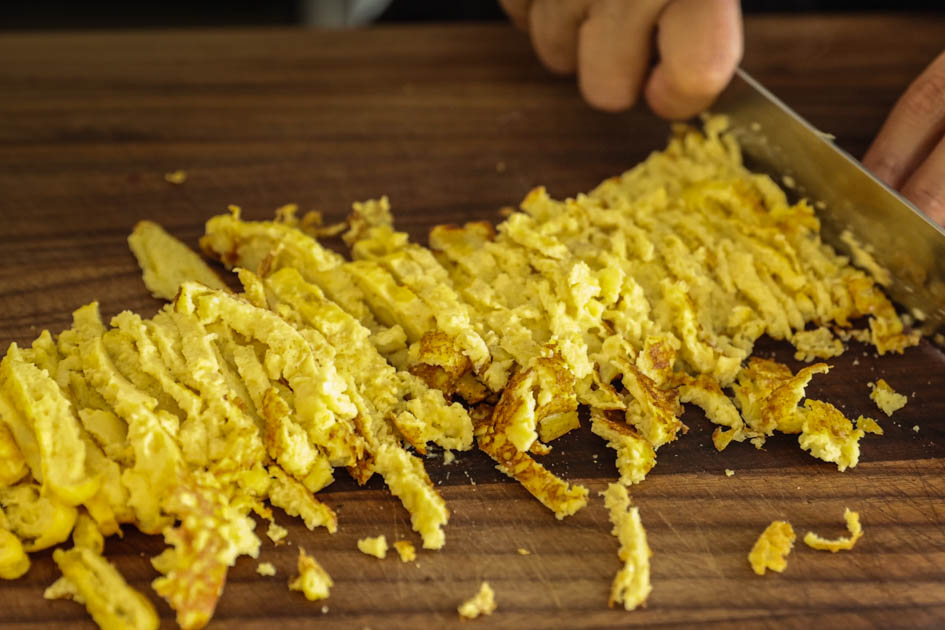
Remove the Gyerranmari from your pan and set it aside to cool. Once it is safe to handle, you can roll the Gyerranmari (like you would a poster) and then julienne the omelet. You can also just cut them into long, 1/2-inch wide strips. I’ve done it both ways and these days, I prefer the julienned omelet.
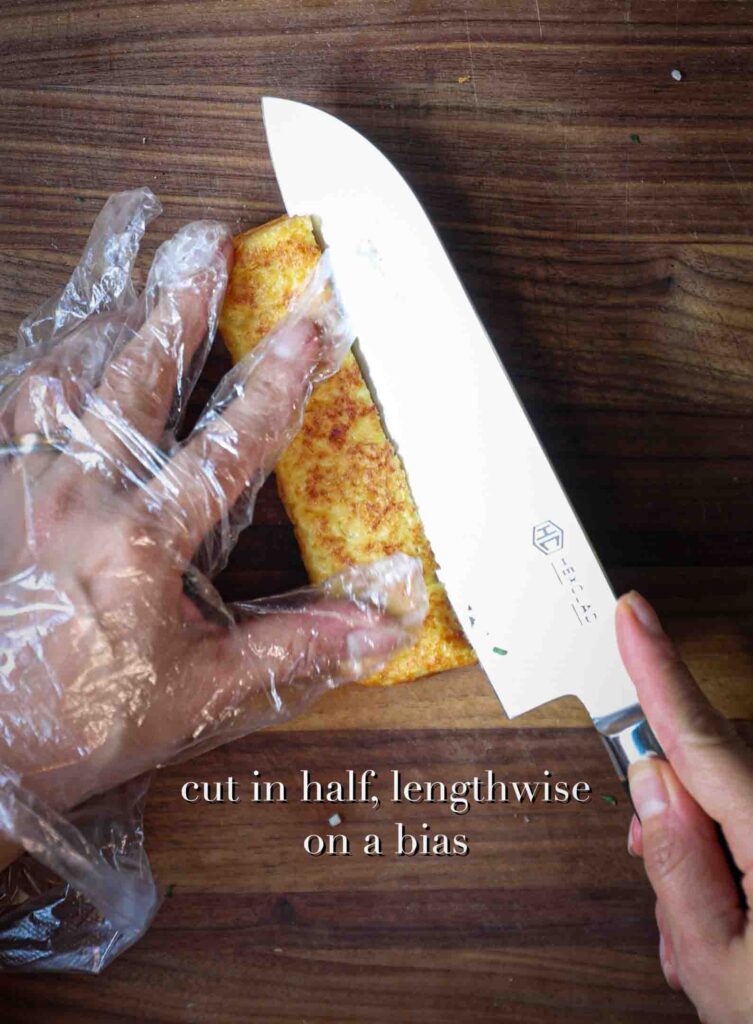
For the Heart Kimbap, you will need to make a proper Gyerranmari–the preparation for which you can find in this video. Just do not mix in any green onions, carrots, or bell peppers. Once you have prepared the Gyerranmari and it has cooled enough to handle, cut the Gyerranmari the same way you cut the two halves of the beet marinated tofu cutlets:


How to make stir-fried vermicelli.
Both the Chunky Kimbap and the Spiral Kimbap will include stir-fried vermicelli noodles. Simply cook your glass noodles according to package instructions (cook them in boiling water for about 8 minutes and then rinse them under cold water).
Add 1/2 tablespoon of extra virgin olive oil to a large sauté pan and when it gets nice and shimmery, add your cooked noodles. Cook for about 30 seconds and then add 1 tablespoon of soy sauce and 1 teaspoon of brown rice syrup (can substitute in maple syrup or your favorite sweetener). Cook for another minute, until all the liquid has been fully absorbed by the noodles. Done!
How to Assemble Your Kimbap.
Finally–the fun part! Time to assemble!
Traditional Kimbap.
First, place one seaweed sheet, shiny side down, on your bamboo mat. Add about 1/2 cup of your Base Rice, starting from the bottom of the sheet towards the top, leaving about 20% of the sheet uncovered at the top. Make sure that you spread your rice evenly over the seaweed sheet, taking care to cover any holes or gaps with additional rice, as needed.
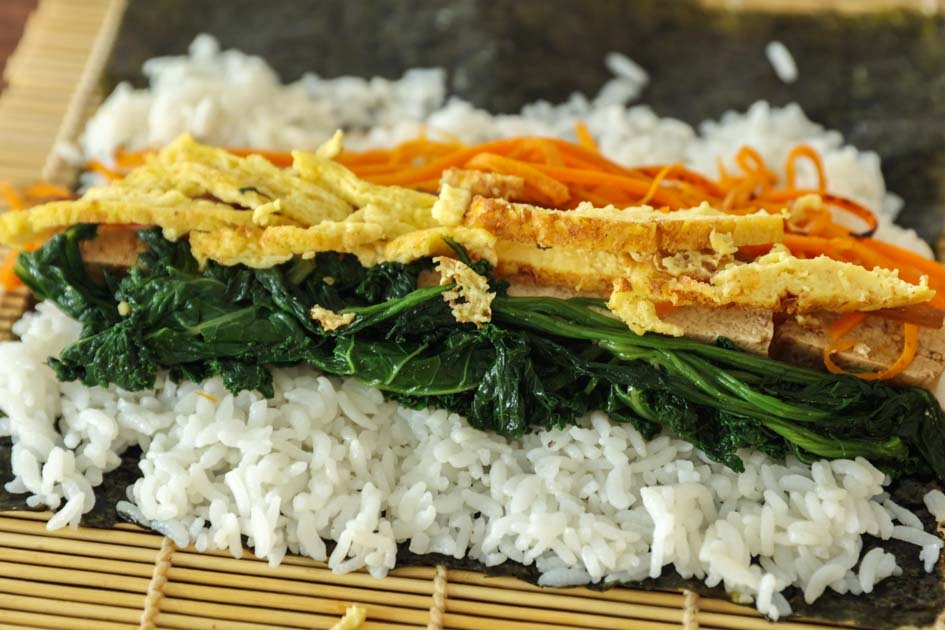
Then, add:
- 2 to 3 batons of baked tofu,
- 2 tablespoons of seasoned spinach,
- 2 tablespoons of sautéed carrots,
- 1 spear of pickled yellow daikon radish,
- 2 spears of pickled burdock root, and
- 2 tablespoons of Gyerranmari (or 2 strips of Gyerranmari).
Next, starting at the bottom, roll the bamboo mat and the nori sheet up, tucking the fillings in, until the bottom of the sheet meets the very top of the riced area. Squeeze, pull the bamboo mat that was rolling the nori (not the nori sheet itself) forward, and roll a little more. Squeeze and repeat until the entire sheet is rolled. Set aside, seam side down (the steam from the rice and the weight of the fillings will seal the roll). Repeat with remaining ingredients.
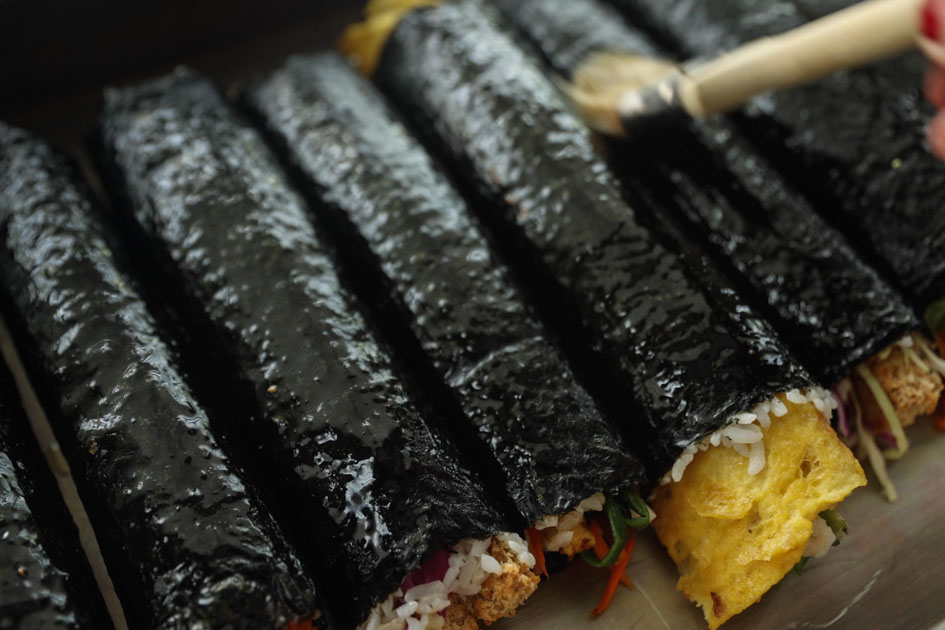
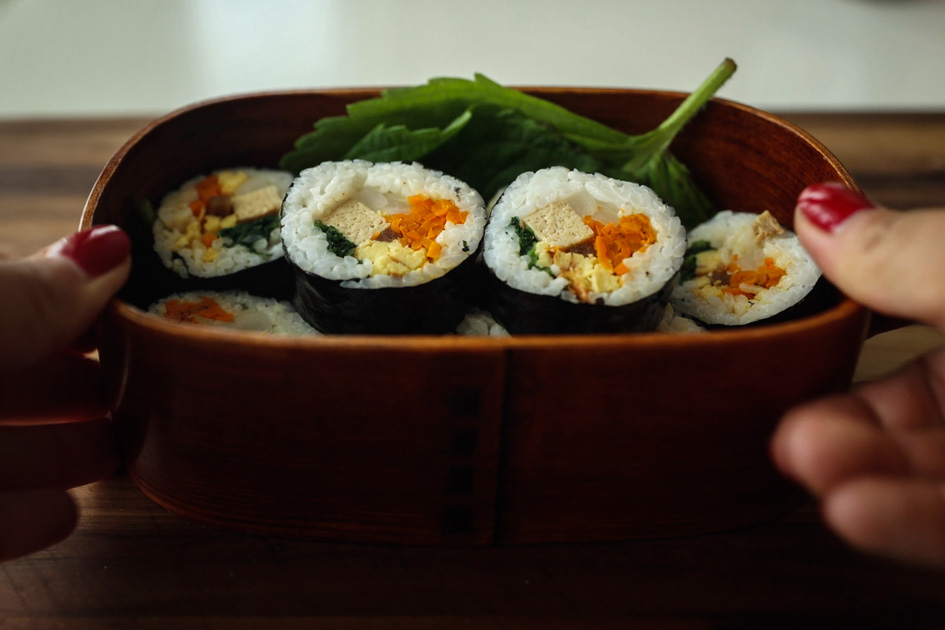
Before slicing the roll into 8 to 10 pieces, brush the roll with a little sesame oil. Use a sharp knife to cut 1/2-inch thick pieces.
Chunky Kimbap.
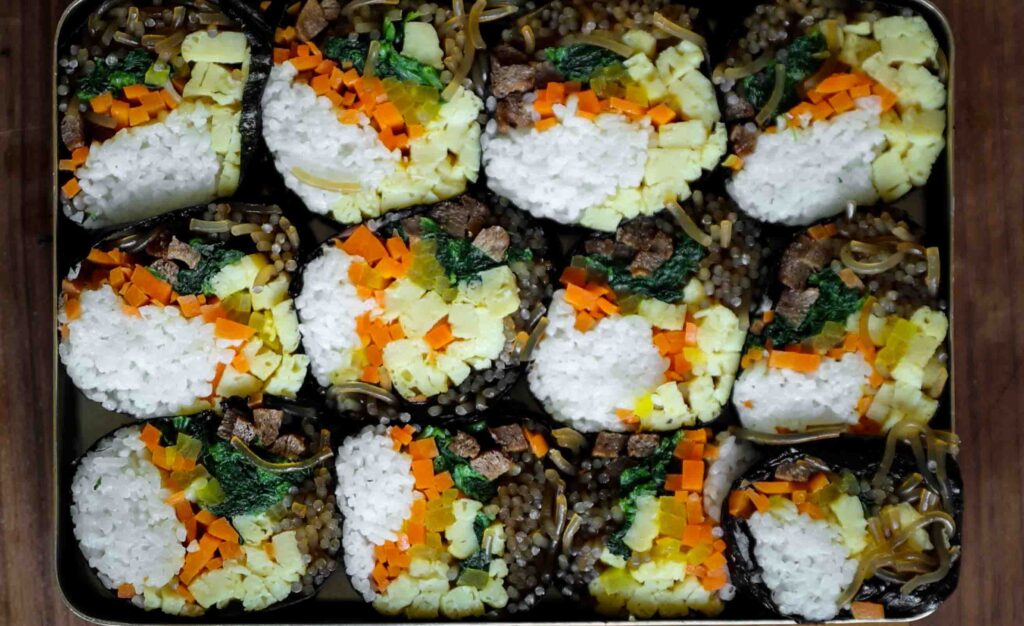
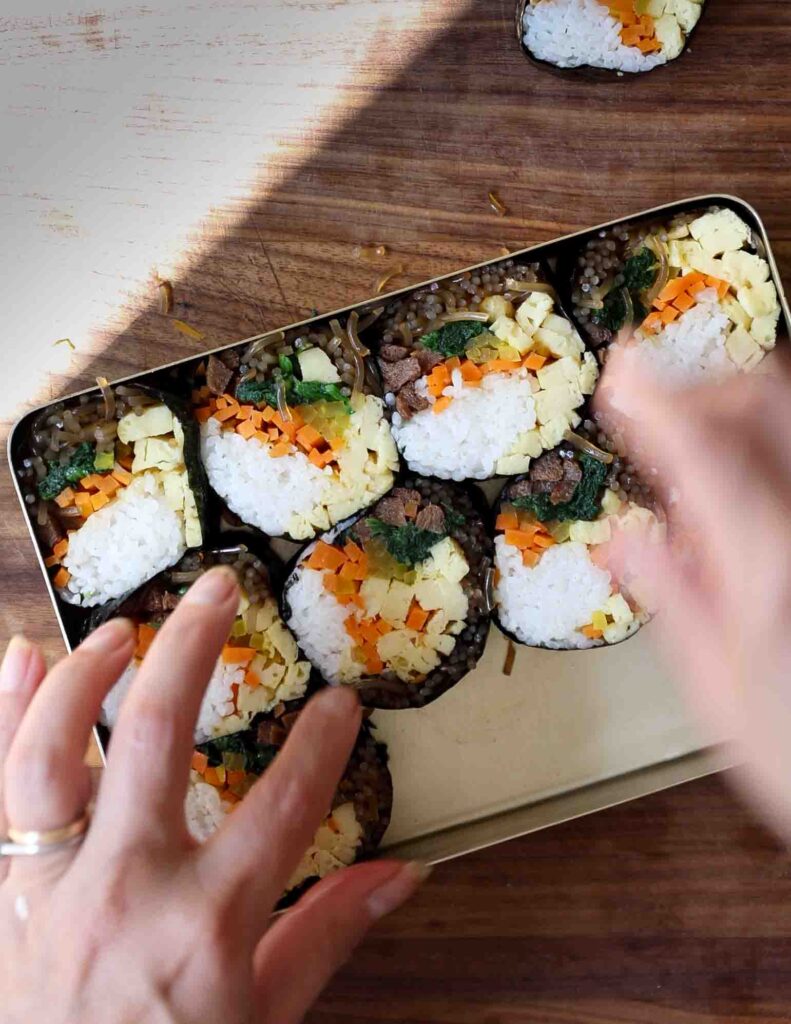
This kimbap is very similar to the Traditional Kimbap–many of the same ingredients are involved. However, instead of spreading the Base Rice across the majority of the seaweed sheet, you shape the Base Rice into one 1-inch thick log (hence the “chunk”).
Lay your seaweed sheet shiny side down on your bamboo mat. Then, assemble your roll in the following order:
- Vermicelli: Begin by laying down about 1-inch thick row of sauteed vermicelli, approximately 1-inch off the bottom.
- Gyerranmari: Next, add a similar volume of Gyerranmari above the vermicelli (not on top, but above).
- Spinach: Add a similar amount of spinach in between and on top of the Gyerranmari and vermicelli (not above, but on top).
- Pickled Daikon Radish: Add half the amount of the yellow daikon radish as you’ve used for all the other ingredients (the pickled radish has a very strong flavor that you don’t want to overpower the rest of the ingredients) on top of the Gyerranmari.
- Plantspired Steak: Add half the amount of Plantspired Steak as you’ve used for the vermicelli on top of the vermicelli.
- Sautéed Carrots: Add a 1-inch thick row of sautéed carrots on top of the pickled daikon radish.
- Base Rice Log: Fit the base rice log on top of the Gyerranmari.
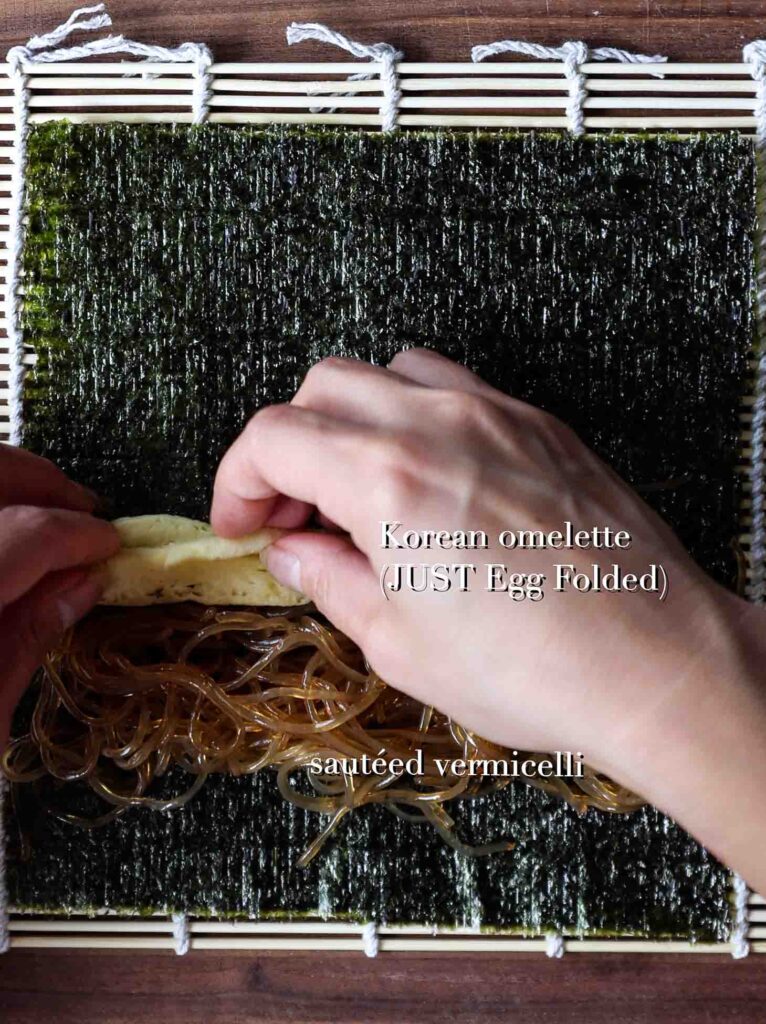
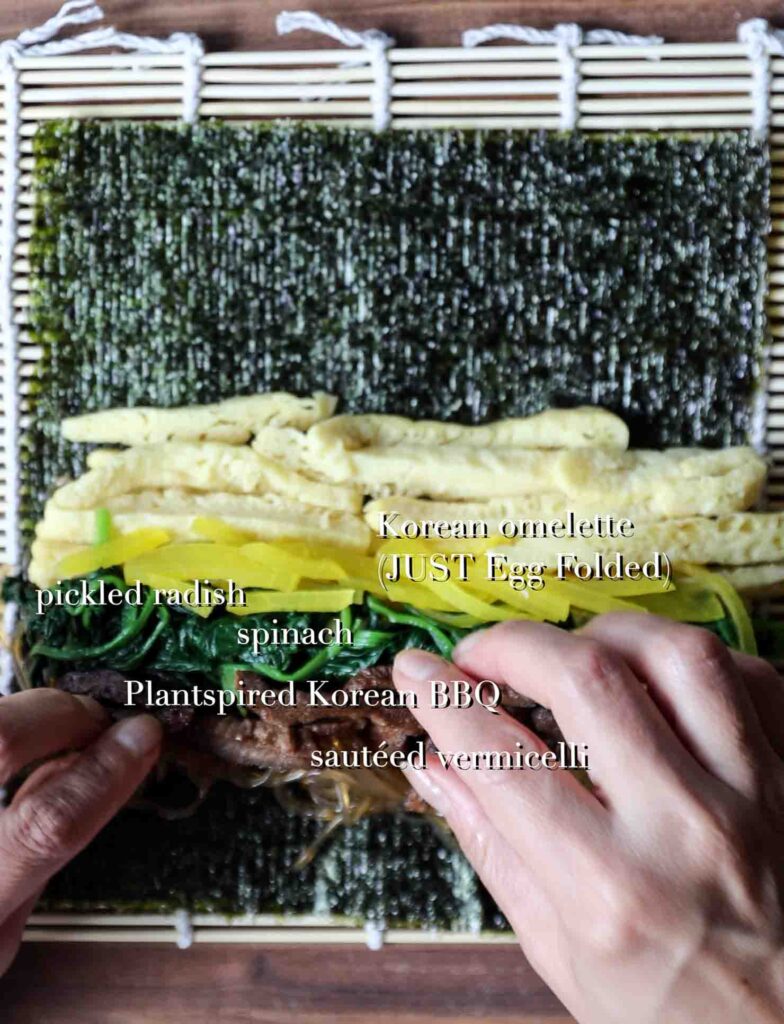
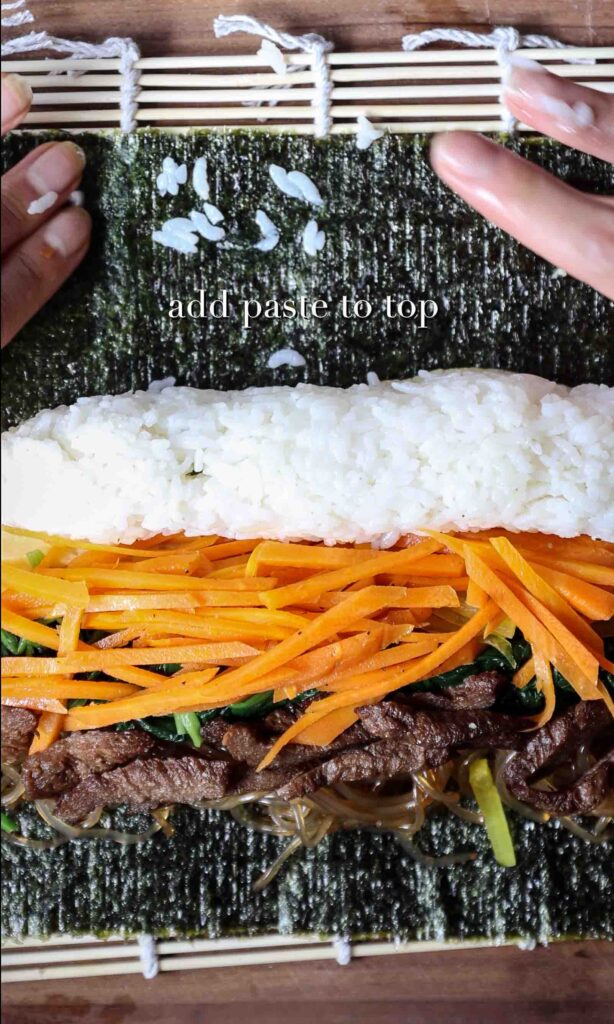
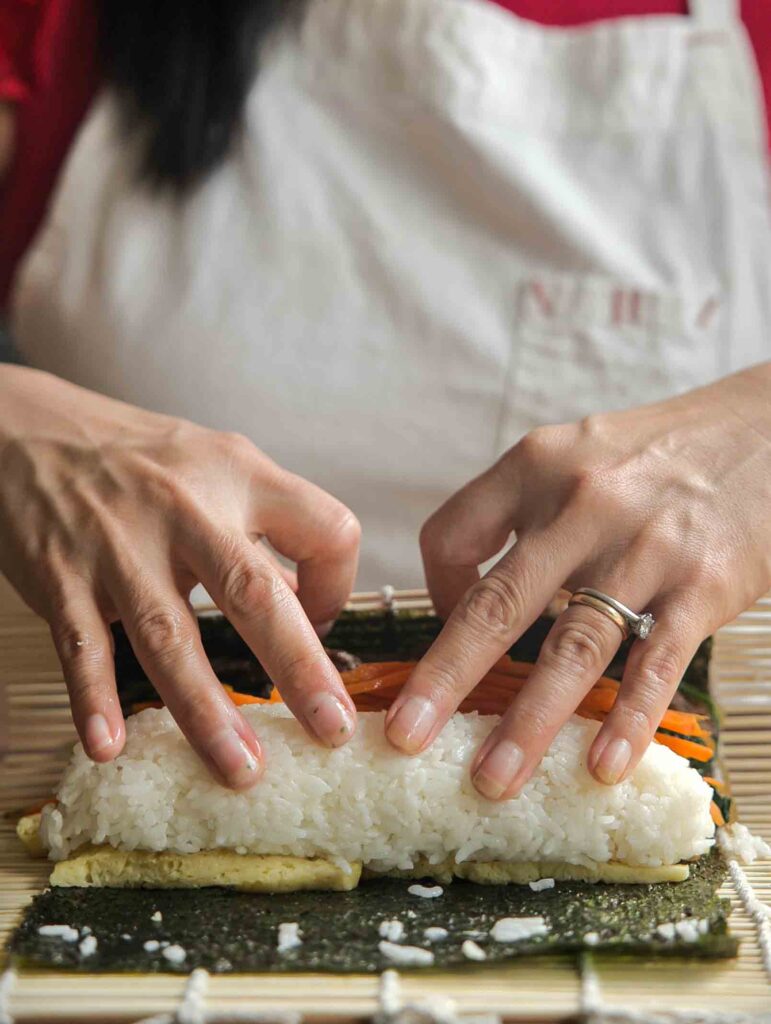
It’s a little hard to visualize the above, so it’s probably a good idea to watch the video below!
To complete assembly, smear a few rice kernels across the top of the seaweed sheet. This will be the “glue” that will hold the roll together. Then, just like with Traditional Kimbap, starting at the bottom, roll the bamboo mat and the nori sheet up, tucking the fillings in, until the bottom of the sheet nearly meets the top of the riced area (there should be about 1.5 inches at the top of the nori sheet that’s bare).
Squeeze the roll and then pull the bamboo mat that was rolling the nori (not the nori sheet itself) forward, and roll a little more. Squeeze and repeat until the entire sheet is rolled. Set aside, seam side down (the steam from the rice and the weight of the fillings will seal the roll). Repeat with remaining ingredients.
Tip: If you find that your seaweed sheet is tearing, I got you. Simply double up on the seaweed sheets. No one will notice and I promise, I won’t tell!
Brush on a little sesame oil and slice into 1/2-inch thick pieces.
Spiral Kimbap.
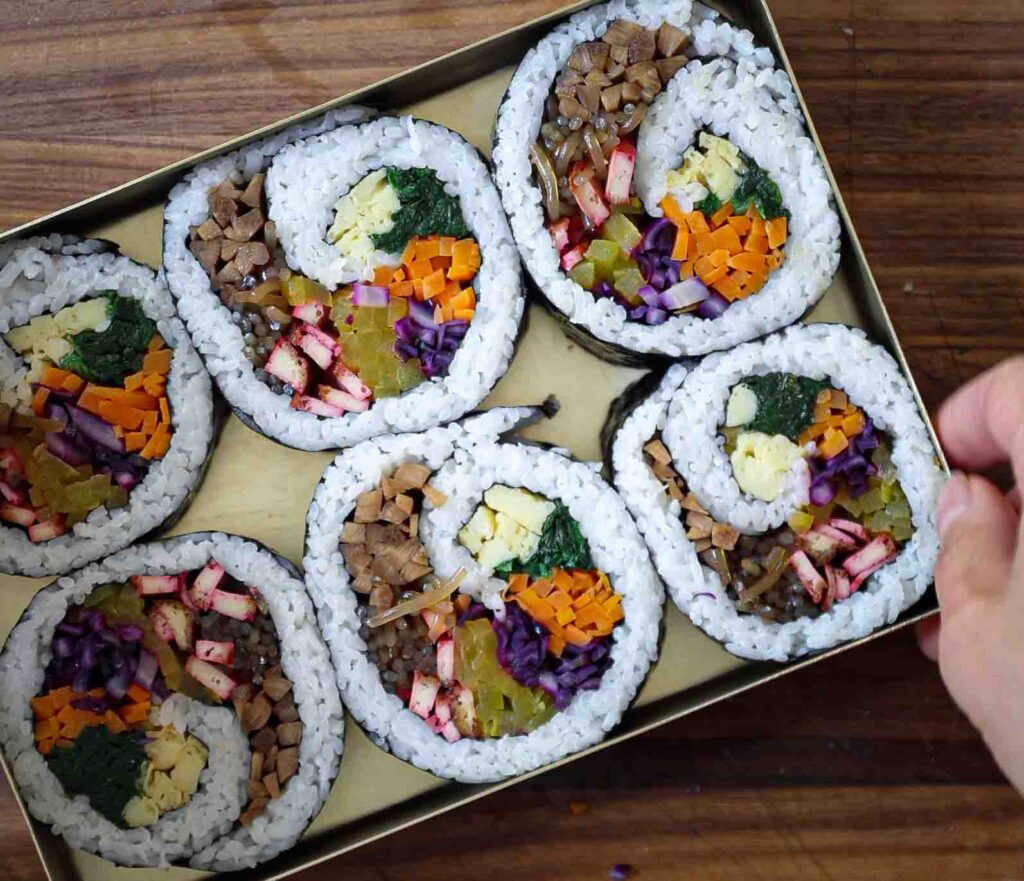
Believe it or not, I find this gorgeous roll to be a lot easier than the Chunky Kimbap!
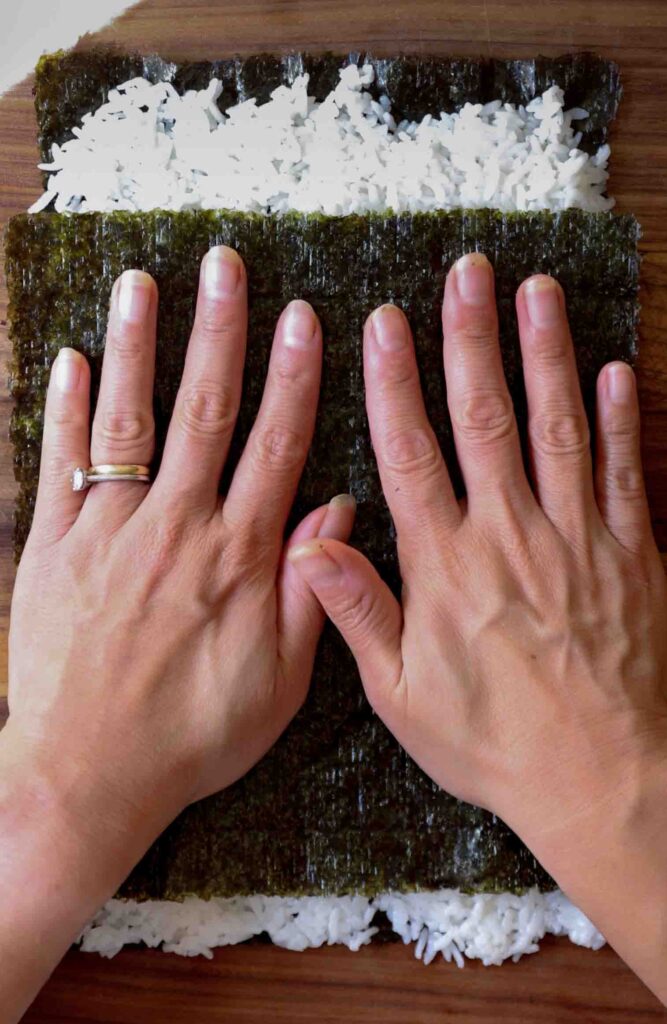
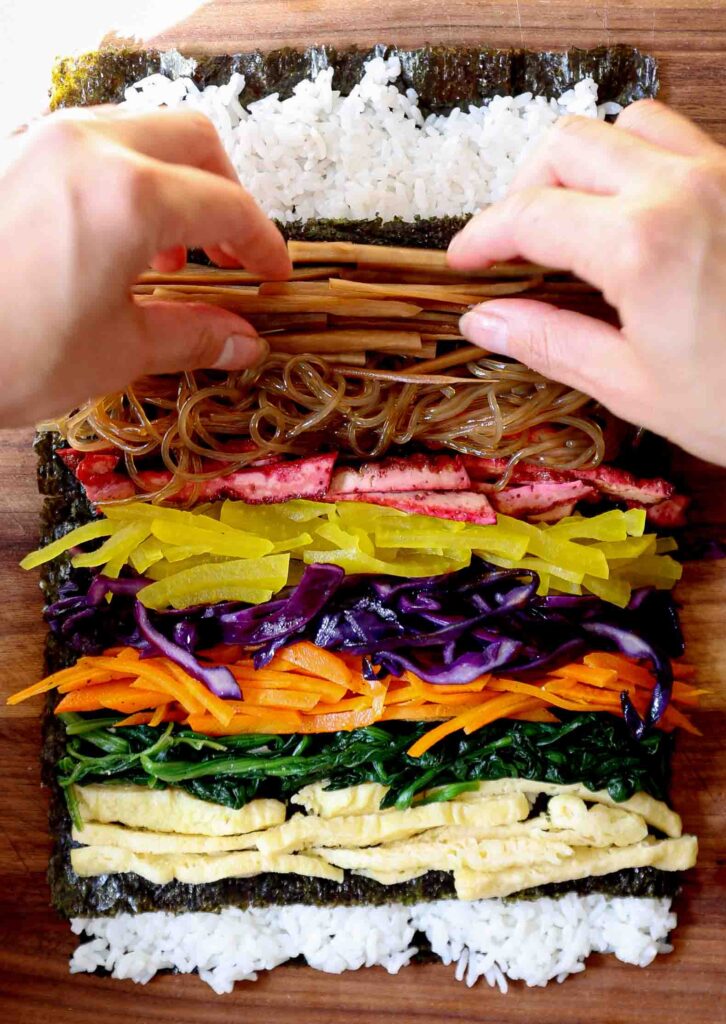
First, slice one seaweed sheet in half. Attach that half to one full sheet by smearing a few rice kernels onto the top of one and pasting the two sheets together, forming one extra long seaweed sheet. Place the extra long sheet on a flat work surface (not a bamboo mat), and cover the entirety of the extra long sheet with approximately 1 cup of base rice. Next, place a standard sized seaweed sheet on top of the rice, positioned approximately 1/2-inch off the bottom.
Next, add approximately 1/2-inch thick rows of the following in this order:
- Gyerranmari
- Spinach
- Carrots
- Cabbage
- Daikon Radish
- Pink Tofu
- Vermicelli
- Burdock Root
Then, starting from the bottom, roll everything up, just like you would a poster, making sure to squeeze along the way. Brush on a little sesame oil and slice into 1/2-inch thick pieces.
Heart Kimbap.

While this kimbap isn’t very hard to roll (unlike Chunky Kimbap), it can be a little challenging to create the heart shapes out of your pink tofu cutlets and Korean omelet. Make sure to watch the video below to see how it’s done.
But before we do that, we’re going to “jazz up” the base rice by adding 2 tablespoons of minced Korean omelet and 2 tablespoons of minced perilla leaves (can substitute raw spinach).
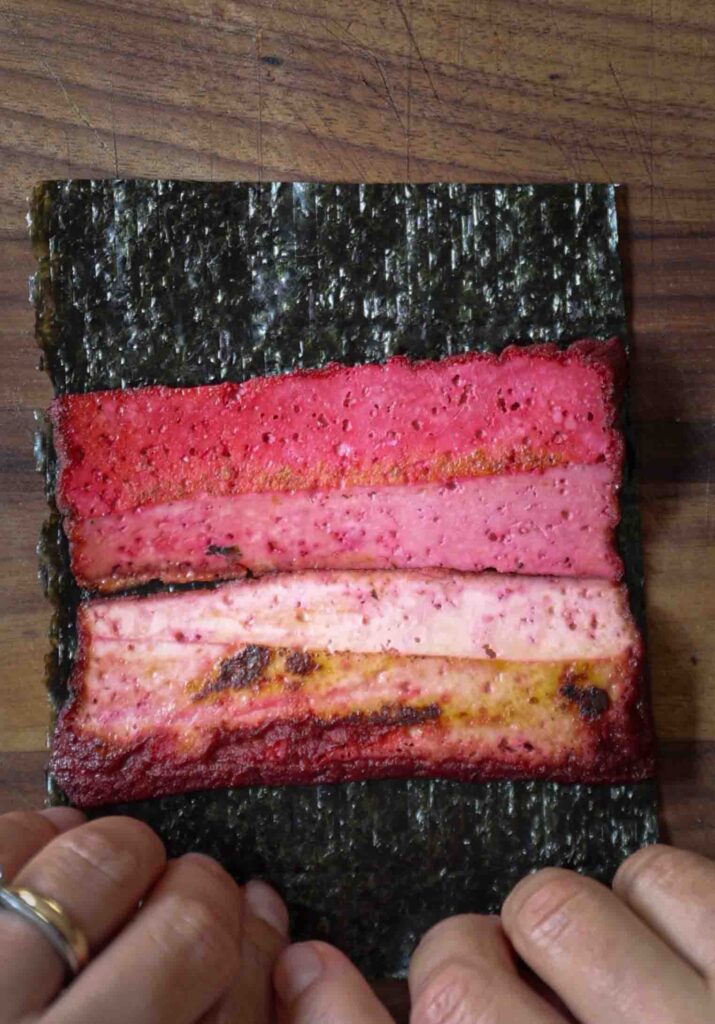
Next, you have to cut the seaweed sheet so that it properly fits your “heart” fillings. Place one half of your heart shaped log, with the biased side facing up and towards the middle, positioned about 1-inch off the bottom. Place the second half of your heart shaped log above the first one, biased side facing up and towards the middle (the biased edges should be facing one another).

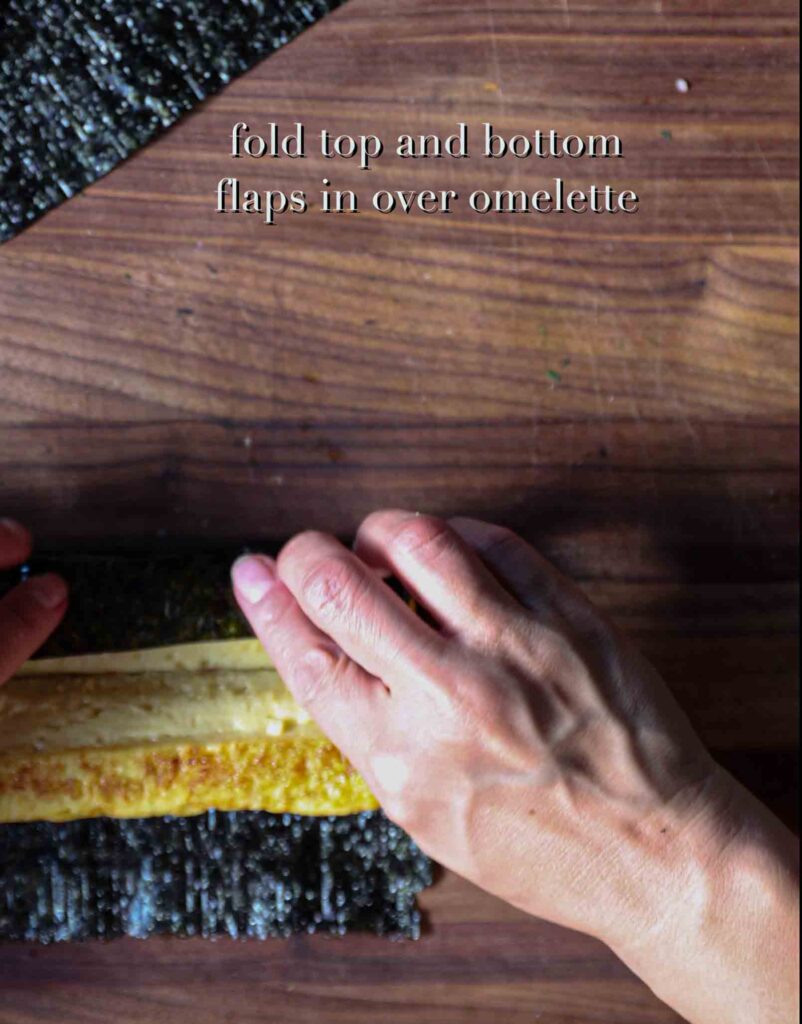


Fold the bottom flap of the seaweed sheet over the first half-log and make sure it’s nearly covered (it doesn’t need to be totally covered). The top of the seaweed sheet will be too long, so measure out how much you’ll need to cover the top half-log and cut away the excess. You’ll also find that there’s excess sheet on the side–cut that away, as well.
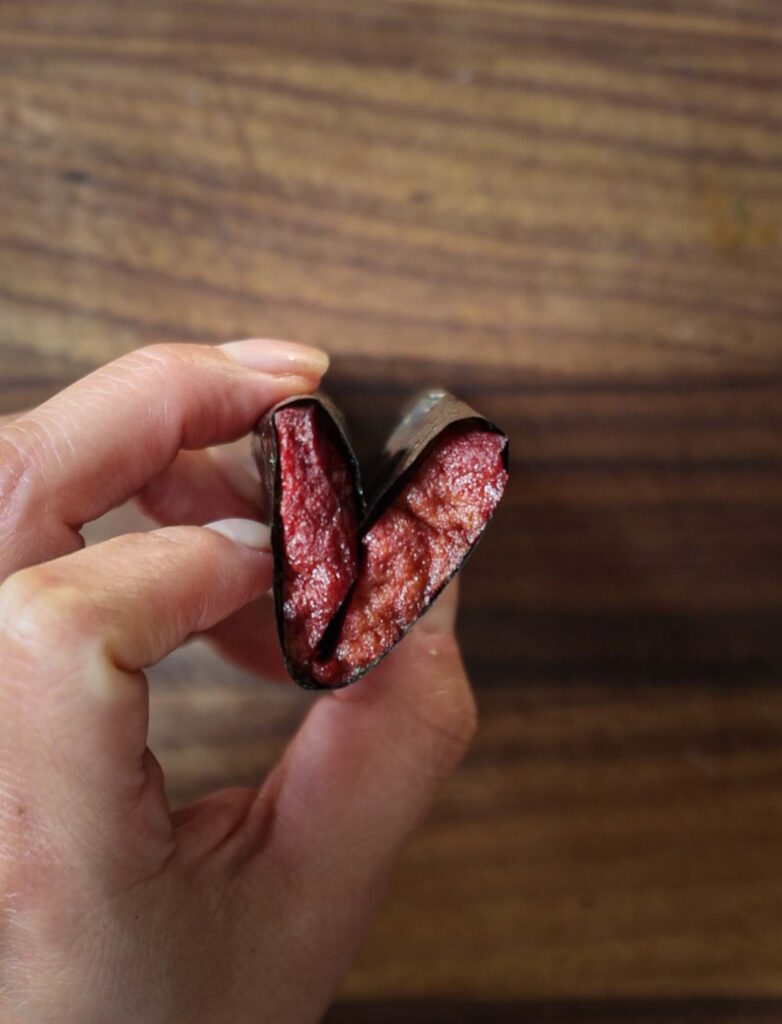
Wrap the half-logs with the seaweed sheet and bring them together to create a heart shape. Take a little rice and press it into the “v” groove at the top of your heart. Take a standard sized sheet of seaweed and place it shiny side down on a flat work surface. Place the heart shaped log on top, so that the left edge is flush with the left edge of the seaweed sheet. Cut off any excess sheet on the ride side of the log. Spread approximately 1/3 cup of rice across almost the entire sheet, leaving about 1-inch blank along the top.
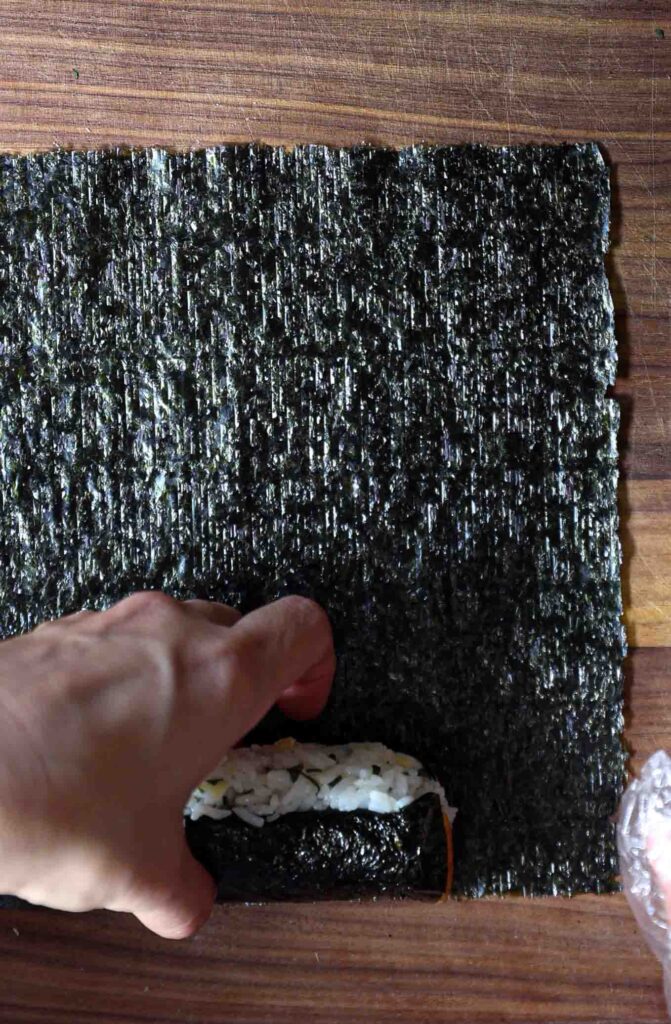
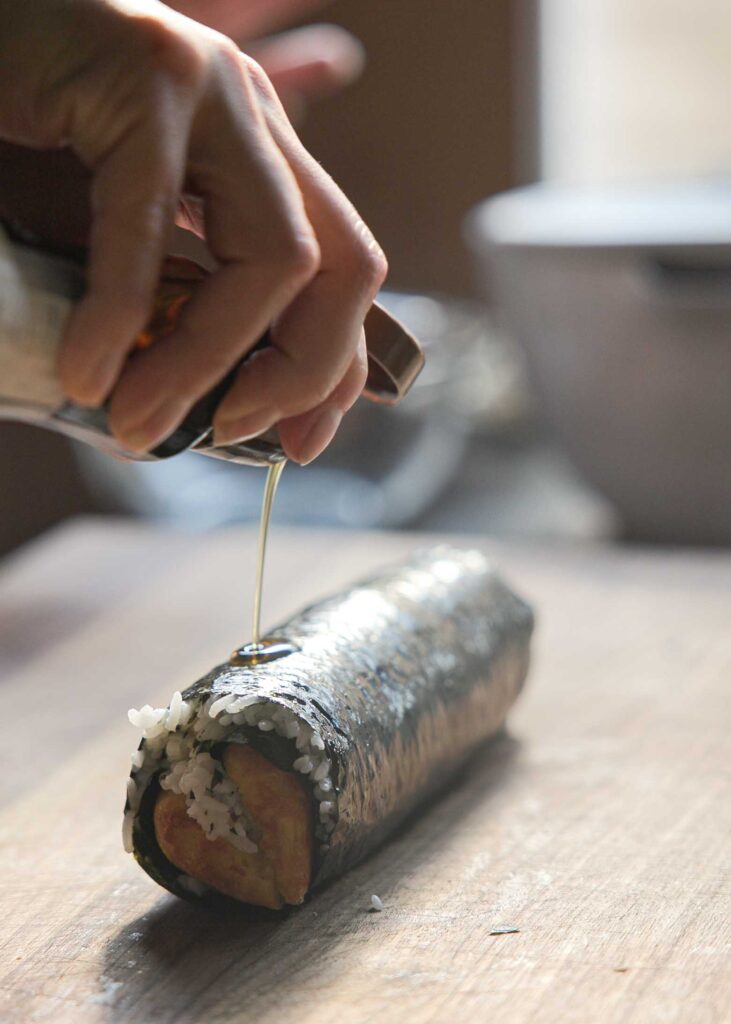
Position the heart shaped log on top of the rice about 1-inch from the bottom. Then, starting from the bottom, roll the sheet up and over the heart shaped log, squeezing along the way, until it reaches the top. Brush on a little sesame oil and slice into 1/2-inch thick pieces.
Video: Watch Me Make Fancy Kimbap
Storing and Reheating Your Kimbap.
The most important thing about kimbap is to know when you want to eat it, because it’s best served immediately. Unfortunately, kimbap does not store well once the rolls have been sliced and cut into pieces. As a result, I do not recommend you make these too far in advance (I know–lots of work!).
If for some unforeseeable reason, you do end up having to delay eating time and thus have to place them in the refrigerator (the tofu!), do not cut into them. When it is time to eat, you can reheat them by covering them with a damp paper towel and heating them in the microwave for approximately 2 to 3 minutes. Then, slice into them. They won’t be the same as fresh kimbap, but they’ll be pretty darn good! You can reheat leftovers the same way!
Another more onerous (but more delicious) way to reheat leftover kimbap is to dip them in a little JUST Egg and fry them up in a non-stick pan. This is not my preferred method, as it’s practically making an entire new dish!
Video: Watch Me Make Traditional Kimbap!
Frequently Asked Questions.
What is the difference between sushi and kimbap?
Sushi is a Japanese dish, while kimbap is a Korean dish. The former utilizes rice seasoned with rice vinegar, mirin, or some other combination of sweet and sour flavors. Kimbap, on the other hand, uses a rice seasoned with sesame oil, salt, and pepper. In addition to this main difference, kimbap does not typically contain raw fish.
What is the difference between bibimbap and kimbap?
Though they sound similar, bibimbap is a rice bowl dish and not rolled up with seaweed. Think of bibimbap as a “deconstructed kimbap,” as many of the ingredients are the same (spinach, carrots, protein, egg, etc.).
Can I put anything into my kimbap?
Generally speaking, yes. However, there are a couple things to keep in mind: first, you want to strive for balance in the fillings–you don’t want it to be one note in flavor, color, texture, or nutrition. Second, you don’t want the ingredients to be too wet–the liquid will simply bleed into the rice and seaweed, making it much more difficult to stay together (this is often why you don’t see kimchi inside kimbap).
Is Kimbap usually served with a dipping sauce?
Unlike sushi, kimbap isn’t typically served with a dipping sauce. The savory flavor of the rice, combined with the textures and flavors of the fillings, are designed to comprise a balanced bite of food that doesn’t require dipping sauce.
Recipe Card
4 Stunning Korean Kimbap
Equipment
- 1 bamboo mat
Ingredients
Traditional Kimbap.
- 2 1/2 cups cooked short grain white rice
- 1 1/2 tbsp sesame oil, plus more for garnish
- 1 lb adult spinach
- 2 tsps sea salt
- 2 tsps black pepper
- 1 tbsp extra virgin olive oil
- 1/2 cup liquid egg replacer (or 1 JUST Egg Folded)
- 1 1/2 cups julienned carrot
- 4 sheets roasted seaweed
- 1 7 oz baked tofu cutlet, cut into batons
- 4 spears yellow or white pickled daikon radish
- 8 spears pickled burdock root
Chunky Kimbap.
- 2 cups cooked short grain white rice
- 1 1/2 tbsp sesame oil, plus more for garnish
- 2 tsp sea salt
- 2 tsp black pepper
- 1 lb adult spinach
- 1 1/2 tbsp extra virgin olive oil
- 1/2 cup liquid egg replacer (or 1 JUST Egg Folded)
- 1 1/2 cup julienned carrot
- 2 oz cooked sweet potato vermicelli
- 1/2 tbsp brown rice syrup
- 1/2 tbsp soy sauce
- 3 oz Plantspired Korean BBQ Steak
- 2 to 4 sheets roasted seaweed
- 1/4 cup julienned pickled daikon radish (or you can use 2 spears)
Spiral Kimbap.
- 2 cups cooked short grain white rice
- 1 1/2 tbsp sesame oil, plus more for garnish
- 2 tsp sea salt
- 2 tsp black pepper
- 1/2 lb adult spinach
- 1/2 cup liquid egg replacer (or 1 JUST Egg Folded)
- 1 cup julienned carrot
- 1/2 cup julienned purple cabbage
- 2 oz cooked sweet potato vermicceli
- 1/2 tbsp soy sauce
- 1/2 tbsp brown rice syrup
- 4 spears pickled burdock root
- 3 oz baked tofu cutlet
- 1/4 cup beet juice
- 5 sheets roasted seaweed
Heart Kimbap.
- 7 oz baked tofu cutlet
- 1/2 cup beet juice
- 1 1/2 tbsp extra virgin olive oil
- 1 cup liquid egg replacer
- 1 tsp sea salt
- 1 tsp black pepper
- 2 cups cooked short grain white rice
- 1 tbsp sesame oil, plus more for garnish
- 3 perilla leaves, chopped
- 1 JUST Egg Folded, chopped into small pieces
Instructions
Traditional Kimbap.
- Make your base rice by stirring together cooked rice, 1 teaspoon of sesame oil, 1/2 teaspoon of salt, and 1/2 teaspoon of cracked black pepper. Set aside.
- Prepare your spinach by adding it to a large pot of boiling water. Cook until the leaves turn bright green (about 1 minute) and remove from heat. Drain and rinse with cold water to prevent the spinach from getting too soggy. Squeeze out as much excess water as possible. In a small bowl, mix together spinach, 1/2 tablespoon sesame oil, 1/2 teaspoon salt, and 1/2 teaspoon black pepper. Set aside.
- Prepare your Korean omelet or Gyerranmari by adding 1/2 tablespoon of extra virgin olive oil to a medium non-stick pan over medium heat. Pour your liquid egg replacer into your pan, sprinkle with a little salt and pepper, and let it cook for about 3 minutes, until a spatula easily loosens the "egg" from the bottom of the pan (if it doesn't come off easily, you need to cook it longer or you don't have a real non-stick pan). Flip the egg like a crepe and cook for another 2 minutes, until both sides are evenly cooked. Remove from heat and let it cool. Cut into 1/2-inch wide strips or julienne.
- Prepare your carrots by adding 1/2 tablespoons of olive oil to a large sauté pan over medium-high heat. When the oil begins to shimmer (about 1 minute), add your carrots to the pan. Sauté for about 2 minutes, until the carrots begin to soften. Season with salt and pepper and finish with 1/2 tablespoon of sesame oil before removing from heat. Set aside.
- To assemble your rolls, place your bamboo mat on a flat work surface. Place a seaweed sheet, shiny side down, on the mat. Take about 3/4 of a cup of your base rice and spread it evenly over approximately 80% of your sheet, starting from the bottom, leaving about 1 1/2-inch strip of bare sheet at the top. Then, place 2 to 4 batons of tofu, 2 tablespoons of spinach, 2 tablespoons of carrot, 1 pickled daikon radish spear, 2 pickled burdock root spears, and 2 strips or 2 tablespoons of Gyerranari in the center of the riced area.
- Using the bamboo mat and starting at the bottom, roll your sheet up and forward (away from you), until the bottom of the sheet meets the very top of the riced area, making sure to use your fingers to tuck in any filling ingredients that try to escape. Gently squeeze the roll, before pulling the bamboo mat loose and pulling it forward. Squeeze and repeat, until the entire sheet is rolled. Repeat with remaining ingredients.
- Brush the rolls with a little sesame oil before slicing into 1/2-inch thick pieces and serving immediately.
Chunky Kimbap.
- Make your base rice by stirring together cooked rice, 1 tablespoon of sesame oil, 1/2 teaspoon of salt, and 1/2 teaspoon of cracked black pepper. Set aside.
- Prepare your spinach by adding it to a large pot of boiling water. Cook until the leaves turn bright green (about 1 minute) and remove from heat. Drain and rinse with cold water to prevent the spinach from getting too soggy. Squeeze out as much excess water as possible. In a small bowl, mix together spinach, 1/2 tablespoon sesame oil, 1/2 teaspoon salt, and 1/2 teaspoon black pepper. Set aside.
- Prepare your Korean omelet or Gyerranmari by adding 1/2 tablespoon of extra virgin olive oil to a medium non-stick pan over medium heat. Pour your liquid egg replacer into your pan, sprinkle with a little salt and pepper, and let it cook for about 3 minutes, until a spatula easily loosens the "egg" from the bottom of the pan (if it doesn't come off easily, you need to cook it longer or you don't have a real non-stick pan). Flip the egg like a crepe and cook for another 2 minutes, until both sides are evenly cooked. Remove from heat and let it cool. Cut into 1/2-inch wide strips or julienne.
- Prepare your carrots by adding 1/2 tablespoons of olive oil to a large sauté pan over medium-high heat. When the oil begins to shimmer (about 1 minute), add your carrots to the pan. Sauté for about 2 minutes, until the carrots begin to soften. Season with salt and pepper and finish with 1/2 tablespoon of sesame oil before removing from heat. Set aside.
- Prepare your vermicelli by adding 1/2 tablespoons of olive oil to a sauté pan over medium-high heat. When it begins to shimmer (about 1 minute), add your cooked noodles, together with soy sauce and brown rice syrup. Toss and sauté for about 1 minute, until all the liquid has been absorbed by the noodles, and remove from heat. Set aside.
- Prepare your Plantspired Steak by slicing them into thin strips. Then, add 1/2 tablespoon of olive oil to a sauté pan over medium-high heat. When it begins to shimmer (about 1 minute), add the Plantspired steak to the pan and sauté for about 3 minutes, until they get nice and dark brown. Remove from heat and set aside.
- To assemble, place your bamboo mat on a flat work surface. Place your seaweed sheet (you can also double up here and use 2 sheets, in case your roll breaks), shiny side down, on the mat. Begin by laying down about 1-inch thick row of sauteed vermicelli, approximately 1-inch off the bottom.
- Next, add a similar volume of Gyerranmari above the vermicelli (not on top, but above). Add a similar amount of spinach in between and on top of the Gyerranmari and vermicelli (not above, but on top). Add half the amount of the yellow daikon radish as you've used for all the other ingredients (the pickled radish has a very strong flavor that you don't want to overpower the rest of the ingredients) on top of the Gyerranmari.
- Add half the amount of Plantspired Steak as you've used for the vermicelli on top of the vermicelli. Add a 1-inch thick row of sauteed carrots on top of the pickled daikon radish. Take about 1/2 cup of base rice and shape it into a 1-inch thick log approximately the same length as the width of your seaweed sheet. Fit the base rice log on top of the Gyerranmari.
- Smear a few rice kernels at the very top of your seaweed sheet. Using the bamboo mat and starting at the bottom, roll your sheet up and forward (away from you), making sure to use your fingers to tuck in any filling ingredients that try to escape. Gently squeeze the roll, before pulling the bamboo mat loose and pulling it forward. Squeeze and repeat, until the entire sheet is rolled. Repeat with remaining ingredients.
- Brush the rolls with a little sesame oil before slicing into 1/2-inch thick pieces and serving immediately.
Spiral Kimbap.
- Make your base rice by stirring together cooked rice, 1 teaspoon of sesame oil, 1/2 teaspoon of salt, and 1/2 teaspoon of cracked black pepper. Set aside.
- Prepare your spinach by adding it to a large pot of boiling water. Cook until the leaves turn bright green (about 1 minute) and remove from heat. Drain and rinse with cold water to prevent the spinach from getting too soggy. Squeeze out as much excess water as possible. In a small bowl, mix together spinach, 1/2 tablespoon sesame oil, 1/2 teaspoon salt, and 1/2 teaspoon black pepper. Set aside.
- Prepare your Korean omelet or Gyerranmari by adding 1/2 tablespoon of extra virgin olive oil to a medium non-stick pan over medium heat. Pour your liquid egg replacer into your pan, sprinkle with a little salt and pepper, and let it cook for about 3 minutes, until a spatula easily loosens the "egg" from the bottom of the pan (if it doesn't come off easily, you need to cook it longer or you don't have a real non-stick pan). Flip the egg like a crepe and cook for another 2 minutes, until both sides are evenly cooked. Remove from heat and let it cool. Cut into 1/2-inch wide strips or julienne.
- Prepare your carrots by adding 1/2 tablespoons of olive oil to a large sauté pan over medium-high heat. When the oil begins to shimmer (about 1 minute), add your carrots to the pan. Sauté for about 2 minutes, until the carrots begin to soften. Season with salt and pepper and finish with 1/2 tablespoon of sesame oil before removing from heat. Set aside.
- Prepare your cabbage by adding 1/2 tablespoon of olive oil to a large sauté pan over medium-high heat. When the oil begins to shimmer (about 1 minute), add your cabbage to the pan. Sauté for about 2 minutes, until the cabbage begins to soften. Season with salt and pepper and finish with 1/2 tablespoon of sesame oil before removing from heat. Set aside.
- Prepare your vermicelli by adding 1/2 tablespoons of olive oil to a sauté pan over medium-high heat. When it begins to shimmer (about 1 minute), add your cooked noodles, together with soy sauce and brown rice syrup. Toss and sauté for about 1 minute, until all the liquid has been absorbed by the noodles, and remove from heat. Set aside.
- Prepare your tofu by slicing your cutlet into 1/2-inch thick pieces, lengthwise (so that you have thinner cutlets). Place them in a small, shallow container, and spoon beet juice over them, making sure that their surfaces are exposed to some beet juice. Place in the refrigerator for at least 30 minutes.
- When the tofu is ready, add 1/2 tablespoon olive oil to a small non-stick pan over medium-high heat. When the oil shimmers (about 1 minute), add your tofu cutlets to the pan and cook for about 2 minutes, until the bright pink color gets a little dark and "baked" into the tofu. Flip the tofu and cook for another 2 minutes, until both sides are evenly cooked. Allow the tofu to cool, before julienning them. Set aside.
- To assemble, slice one seaweed sheet in half. Attach that half to one full sheet by smearing a few rice kernels onto the top of one and pasting the two sheets together, forming one extra long seaweed sheet. Place the extra long sheet on a flat work surface (not a bamboo mat), and cover the entirety of the extra long sheet with approximately 1 cup of base rice. Next, place a standard sized seaweed sheet on top of the rice, positioned approximately 1/2-inch off the bottom.
- Next, add approximately 1/2-inch thick rows of the following in this order: Gyerranmari, Spinach, Carrots, Cabbage, Daikon Radish, Pink Tofu, Vermicelli, Burdock Root.
- Starting at the bottom, roll your sheet up and forward (away from you), making sure to use your fingers to tuck in any filling ingredients that try to escape. Gently squeeze the roll as you keep rolling forward, until the entire sheet is rolled. Repeat with remaining ingredients.
- Brush the rolls with a little sesame oil before slicing into 1/2-inch thick pieces and serving immediately.
Heart Kimbap.
- Prepare your tofu cutlet by submerging the entire cutlet in beet juice. Place it in the refrigerator for at last 30 minutes. When the tofu is ready, add 1/2 tablespoon olive oil to a small non-stick pan over medium-high heat. When the oil shimmers (about 1 minute), add your tofu cutlets to the pan and cook for about 2 minutes, until the bright pink color gets a little dark and "baked" into the tofu. Flip the tofu and cook for another 2 minutes, until both sides are evenly cooked. Remove from heat and allow the tofu to cool.
- Afterwards, place the cutlet on a cutting board, with the longer side closer to you. Slice the cutlet in half, by cutting across, creating two long halves. Place one of the halves on your work surface, with the shorter side closer to you (so it's like a column, not a row). Carefully trim the top left and bottom right corners, so that they are rounded. Then, slice the column in half with a diagonal cut through the center (see diagram above).
- To make the Gyerranmari or Korean omelet (not the simple way, like in the above 3 recipes), 1/2 tablespoon of oil to a s small non-stick pan (preferably a rectangular one) over medium heat and pour approximately 1/2 of your liquid egg into the pan. Sprinkle with a little salt and pepper. Allow it to cook for about 3 minutes, until the edges begin to pull away easily from the pan. Begin rolling the egg from left to right, to create a column.
- Once you've rolled up the entire egg, gently push the "egg column" back to the edge of your pan. Add a tiny bit of oil to the pan before pouring about 1/4 of your remaining liquid egg where your cooked egg ends. Allow the egg to cook, roll, and repeat with your remaining egg. Once all your egg has been used up, remove the omelet from your pan and allow it to cool. Cut the Gyerranmari in half, through the center, diagonally (see diagram above).
- Prepare your rice by mixing together cooked rice, 1/2 teaspoon sesame oil, chopped pieces of JUST Egg folded, chopped perilla leaves, 1/2 teaspoon of salt and 1/2 teaspoon of black pepper.
- To assemble, cut seaweed sheet so that it properly fits your "heart" fillings. Place one half of your heart shaped log (either tofu or Gyerrannari), with the slanted side facing up and towards the middle, positioned about 1-inch off the bottom. Place the second half of your heart shaped log above the first one, slanted side facing up and towards the middle (the biased edges should be facing one another).
- Fold the bottom flap of the seaweed sheet over the first half-log and make sure it's nearly covered (it doesn't need to be totally covered). Measure out how much of the seaweed sheet you'll need to cover the top half-log and cut away the excess. Cut away any excess sheet you have to the side of your logs.
- Wrap the half-logs with the seaweed sheet and bring them together to create a heart shape. Take a little rice and press it into the "v" groove at the top of your heart.
- Take a standard sized sheet of seaweed and place it shiny side down on a flat work surface. Place the heart shaped log on top, so that the left edge is flush with the left edge of the seaweed sheet. Cut off any excess sheet on the ride side of the log. Spread approximately 1/3 cup of rice across almost the entire sheet, leaving about 1-inch blank along the top.
- Position the heart shaped log on top of the rice about 1-inch from the bottom. Then, starting from the bottom, roll the sheet up and over the heart shaped log, squeezing along the way, until it reaches the top. Brush on a little sesame oil and slice into 1/2-inch thick pieces.


Incredible! Is there anyone on the planet who wouldn’t be delighted by a plate of these? Question: Is each piece intended to be eaten in a single bite? Or do you ever attempt to eat half of one w/o it coming apart?
I was raised in US and now settled in Sydney. When I was in college, I met a Korean family who used to invite me over for dinner. I fell in love with Korean food and ever since I’ve become a vegan I ve missed this stuff. So I’m so glad I can now make these vegan Korean dishes to enjoy with some kdrama!:) thank you for sharing some really close to authentic Korean food. I make your “I don’t give a ..” kimchi recently and it’s amazing! Living in Korean neighbourhood here in Sydney I don’t need to look for store bought vegan kimchi anymore (which is soooo hard to find). Sending my love hugs and thanks your way.
I was raised in US and now settled in Sydney. When I was in college, I met a Korean family who used to invite me over for dinner. I fell in move with Korean food and ever since I’ve become a vegan I ve missed this stuff. So I’m so glad I can now make these vegan Korean dishes to enjoy with some kdrama!:) thank you for sharing some really close to authentic Korean food. I make your “I don’t give a ..” kimchi recently and it’s amazing! Living in Korean neighbourhood here in Sydney I don’t need to look for store bought vegan kimchi anymore (which is soooo hard to find). Sending my love hugs and thanks your way.
I totally agree–store bought vegan kimchi, much less GOOD vegan kimchi, is very hard to find!! Good luck in Sydney with creating your own korean vegan pantry and kitchen!!
Stunning is the perfect word for these Kimbap variations! Joanne has done it again by breaking down the steps needed and elevating our skill set. SO delicious and such an experience to enjoy these little works of art, one bite at a time!
Just made these today and I and my family love them! This is going into the regular recipe rotation. We didn’t make the “egg” and I added some cooked white sweet potato and used smoked tofu. Turned out my greens had wilted, so no spinach, but I used steamed sweet peas in the pod. I need to work on my rolling, getting it tighter and also need to get my hands on some perilla leaves. I am actually making more rice right now as we want more!! Thanks for all the great recipe inspiration!