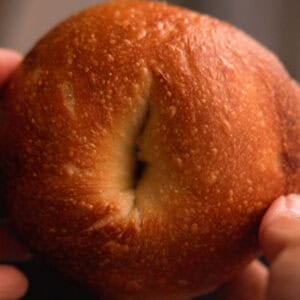
NY Style Bagels
This diligently tested recipe for NY style bagels reliably creates 10 perfect bagels with a beautiful, blistered crust on the outside and a chewy, tender crumb on the inside. Whether you're in NYC or in some random suburb on the West Coast, there is now no need to settle for anything less than the BEST NY style bagels that are bursting with flavor. Add your favorite smear, some thinly sliced tomatoes, capers, and fresh dill, and you'll be transported to the streets of Brooklyn in a heartbeat!
Equipment
- 9-cup food processor
- food scale
- 4 bagel boards
- Parchment paper
- large baking trays with lids
- steel pizza pan or baking sheet pans
Ingredients
Bagel Dough.
- 4 g active dry yeast
- 400 g water (at room temperature)
- 40 g dark brown sugar
- 770 g high protein flour
- 30 g diastatic malt powder
- 20 g Kosher salt
- 24 g vegetable oil (or any neutral oil)
Bagel Boiling Water.
- 2 tbsp barley malt syrup
- 2 qts water
Optional Bagel Toppings.
- 2 tbsp sesame seeds
- 2 tbsp poppy seeds
Instructions
- Add your yeast and brown sugar to your water and stir. Set that aside for 10 minutes, until your yeast mixture foams. It doesn't have to overflow with foam—even a small foamy film is enough.
- Next, add your flour, diastatic malt, and salt to the food processor. Mix on low (or use the "dough" function) for about 5 seconds. Then, slowly pour in your entire yeast mixture (use a rubber spatula to scrape up any sugar or yeast sticking to the bottom of your container). Then, add your oil. Knead on low for four 30-second increments, for a total of 2 minutes (my food processor will knead for only 30 seconds before stopping on its own). This will guard against overheating. When done, your dough will be very stiff and dimply. Don't worry.If using a stand-mixer, knead on low (2 on KitchenAid) for 4 minutes. Then, move to medium-low (4 on KitchenAid) for 8 to 12 minutes, until your dough feels stiff and firm. For more on why I prefer a food process over a stand-mixer, see Food Processor in Special Equipment Section above.Knead your dough by hand for about 15 seconds and then shape into a ball. Place your dough in a lightly greased bowl, cover it, and let it rest for 15 minutes.
- While your dough is resting, cut out parchment paper squares. Make them much larger than you think you'll need to. I make mine 6" x 6".
- After about 15 minutes, your dough ball will still look mottled, but once you start handling it, you'll find it supple and easily shapeable—kind of like Play-Doh. Remove it from the bowl and weigh it (mine is usually between 1,260 to 1,300 grams). Divide this number by 10 to figure out the weight of each bagel (mine usually range from 126 to 130 grams). Then, using a sharp knife or bench scraper, pull off enough dough for one bagel, weighing it to make sure. Place the rest of your dough underneath a plastic bag or kitchen towel to prevent drying out.
- Your dough hunk will usually look like a vague sort of triangle (mine usually does). Pull the top half of your dough hunk and fold it over, into the middle of your hunk. Press it in with the heel of your hand. Roll the top half down again, so that the bottom "flap" is covered and, once more, use the heel of your hand to press down and seal the dough. Then, cup your hands over the top of the dough and gently roll back and forth, until you have a very stubby, short log (around 4 inches long). Set aside under your plastic baggie and repeat with remaining dough, until you have a total of 10 stubby logs.
- Once you've pre-shaped all your dough, move onto finally shaping your NY style bagels. Roll the short log, starting from the middle out towards the ends, so that it's just a bit longer (around 6 inches). Do not make the logs too long, as this will prevent dough tension, yielding a flatter, wider bagel.
- Then, twist the log by rolling up with your right hand and rolling down with your left hand. Grab the right end with your right hand and wrap the log around your knuckles, bringing the two ends together, usually somewhere around your right thumb. Bring your right hand down to your working surface (with the log still wrapped around your knuckles) and roll up and down and from side to side, while exerting pressure on the section where the two ends meet. Then gently roll your right hand down all the way through until it exits the hole completely.This should seal the seam, but if you feel nervous they'll come apart, you can pinch the seam together using your fingers, as well.*For more on why I prefer the roll method (as opposed to the poke method) for shaping my bagels, see FAQ above.
- Spray a tiny bit of cooking spray onto the bottom of your parchment square. Place your shaped bagel on top and carefully transfer to your large baking tray. Repeat with remaining dough. Cover your tray and let it proof for about 30 minutes.
- Place your shaped bagels, covered, in the refrigerator for at least 24 hours and up to 40 hours. Do not proof for longer than 40 hours, as doing so will likely yield overproofed bagels.
- Arrange the racks in your oven so that the uppermost one is set in the middle. Place your baking surface (I use a steel pizza pan—for more on this, see Pizza Pan and Sheet Pan in Special Equipment section above) on that top rack. Place a sheet pan on the bottom rack (this will prevent the bottoms of your bagels from burning). Preheat your oven to 500° F.
- Add 2 quarts of water to your pot and bring it to a gentle boil. When the water is getting hot (but before it boils), add barley malt syrup (the warm water will make it dissolve better).
- While your oven is preheating and your water is coming to a boil, soak your bagels boards (I use 4 total bagel boards—you don't want to crowd them) by running both sides beneath your faucet for a few seconds. Place your soaked bagel boards near your stovetop (i.e., where your water is boiling).
- Measure out whatever toppings you plan on using (e.g., 2 tbsp sesame seeds, 2 tbsp poppy seeds, 2 tbsp Everything Bagel Seasoning) into shallow bowls and place them near your stovetop (i.e., where your water is boiling).
- Do not bring your cold-proofing bagels out of the fridge for even one second before you're ready to boil them, as doing so will risk overproofing them—especially if they're hanging out by a warm stove.When your water (treated with barley malt syrup) is at a gentle boil (not a riotous boil, as this will risk deflating your bagels!), gently deposit one or two of your bagels, parchment paper side down, into the water. Count to 10. Using tongs, gently remove the parchment paper from the bottoms and using a slotted spoon, gently flip the bagels over. Count to 20. Flip them over again. Count to 10. Flip them over once more and then remove each bagel from the water, draining as much water as you can, and gently place them, top side down, on either the soaked bagel boards (for plain bagels) or the bowl with the topping of your choice.
- Using your hands, carefully transfer any bagels treated with toppings to the soaked bagels boards, leaving them top side down. Each bagel board is loaded with no more than three bagels. My pizza pan is only large enough to comfortably accommodate 5 bagels at a time, so I bake in batches.Place two bagel boards directly on top of your baking surface. Bake for 5 minutes. Then, carefully flip the bagel boards so that the bagels are now baking top side up. This will take practice. If you miss or your bagels don't flip but slide off onto your pan, don't worry. Use tongs to flip and position them onto your pan (I did this the other day and they still turned out great). Bake for an additional 5 minutes. Rotate your pan and bake for an additional 5 minutes, until your NY style bagels are blistered and brown and risen to the upper echelons of bagel glory.Using tongs, remove the bagels from your baking surface (mine come right off without sticking—that's the magic of bagel boards) and place on a wire rack or wooden surface to cool. Bake the remaining bagels using the same method as described above.
Notes
Check out the Key Ingredients and Substitutions Section for recommended modifications.
Use active dry over instant yeast to avoid the risk of over-proofing your bagels.
Use a food processor in lieu of a stand-mixer to knead your dough to save time and ensure proper gluten formation.
Check out the FAQ on which shaping method is best for you!
Do not skip on the parchment paper--doing so can lead to over-handling of the bagel dough, which can lead to deflated bagels.
Spraying the bottoms of the parchment squares will make the bagels much easier to retrieve from your baking tray.
Getting a large baking tray that comes with a lid will ensure the bagels will not touch each other or graze the lid as they expand.
Using bagels boards prevent sticking and burning and also make the bagels easier to flip in the oven.
Slide an unused baking sheet onto the bottom tray of your oven to add a protective layer between your bagels and your heat source to guard against burnt bottoms.
Check out the "Final Results Section" to see the results of the different cold-proof times.
Nutrition
Calories: 342kcalCarbohydrates: 63gProtein: 11gFat: 2gSaturated Fat: 0.4gPolyunsaturated Fat: 1gMonounsaturated Fat: 1gTrans Fat: 0.02gSodium: 791mgPotassium: 9mgFiber: 3gSugar: 7gVitamin C: 0.001mgCalcium: 14mgIron: 1mg
Tried this recipe?Let us know how it was!